Bulk Payout Links
Create Payout Links in bulk by uploading the required data in a CSV or XLSX file on the Dashboard.
You can use the bulk upload feature to create a large number of Payout Links from the RazorpayX Dashboard in 3 easy steps:
- Download the Sample Template.
- Add the required data to the template.
- Upload the template from the Dashboard.
To upload a bulk file from the RazorpayX Dashboard:
- Log into your RazorpayX Dashboard.
- Navigate to Payout Links → Bulk Payout Links.
- Download the Sample Template.
- Add the required data to the file. Ensure the data is formatted correctly.
- Upload the file from the Dashboard.
- Select the account from which the payout should be made. This can be:
- Virtual Account
- Current Account
- Enter the OTP sent to your registered mobile number/email address.
- Click CREATE PAYOUT LINK.
Handy Tips
You can set 'Expiry Date' on Bulk Payout Links. Know more about Payout Links Expiry.
After a batch file is uploaded, before creating payout links, the system runs a check to validate the data in the batch file.
Errors in data are shown during this validation exercise. The table below lists possible errors and corresponding error messages:
S.No
| Error Message
| Description
|
1
| Invalid Expiry Date format, should be DD/MM/YYYY
| Expiry date is not in the DD/MM/YYYY format. Change in batch file and upload again.
|
2
| Invalid Expiry Time format, should be HH:MM
| Expiry time is not in the h:m format. Change in batch file and upload again.
|
3
| Expiry Date missing, but Expiry Time present
| Expiry time has been entered but not the expiry date. Enter expiry date in the batch file and upload again.
|
4
| Invalid value for field(s): expire_by. Cannot be less than the current time + 15min
| Expiry date and time can not be in the past. Enter a value which is at least 15 minutes ahead of the present time.
|
The table below lists the various fields in the Sample Template and describes each field:
Name of Contact mandatorystring The contact's name. This field is case-sensitive. Has minimum of 3 characters. and a maximum of 50 characters is allowed. The name cannot end with a special character, except .. Supported characters: a-z, A-Z, 0-9, space, ’ , - , _ , / , ( , ) and , .. For example, Gaurav Kumar.Payout Link Amount mandatorynumber The amount, in paise, to be transferred to the contact. For example, 1000. The minimum value is 100.Contact Phone Number mandatorystring. The contact's phone number. For example, 9123456789.Contact Email ID mandatorystring The contact's email address. For example, gaurav.kumar@example.com.Send Link to Phone Number mandatorystring. Determines who sends the Payout Link to the contact via SMS. Possible values:
Yes - Razorpay sends the Payout Link to the contact via SMS.No - You send the Payout Link to the contact via SMS.
Send Link to Mail ID mandatorystring. Determines who sends the Payout Link to the contact via email. Possible values:
Yes - Razorpay sends the Payout Link to the contact via email.No - You send the Payout Link to the contact via email.
Contact Type mandatorystring The classification of contact that is being created. For example, employee. The following classifications are available by default:
vendorcustomeremployeeself
Handy Tips
Additional classifications can be created from the Dashboard, if required.
Payout Purpose mandatorystring The purpose of the payout that is being created. The following classifications are available in the system by default:
refundcashbackpayoutsalaryutility billvendor bill
Handy Tips- Additional purposes for payouts can be created from the Dashboard, if required.
- This field is case-sensitive.
Payout Description mandatorystring The description for the Payout Link you entered. This appears on the Payout Link hosted page.Reference ID optionalstring A user-generated reference given to the payout. For example, Acme Transaction ID 12345. You can use this field to store your own transaction id, if any.Internal notes: Title optionalstring You can enter custom notes for your reference. Enter the note title in this column. This is not shown to the contact. For example, Refund 08 Feb 2021.Internal notes: Description optionalstring You can enter custom notes for your reference. Enter the note description in this column. This is not shown to the contact. For example, Evening Batch.Expiry Date optionalstring You can enter expiry date for the payout. For example, 22/07/2021.Expiry Time optionalstring You can enter expiry time for the payout. Input should be in the 24 hour format. For example, 14:52.
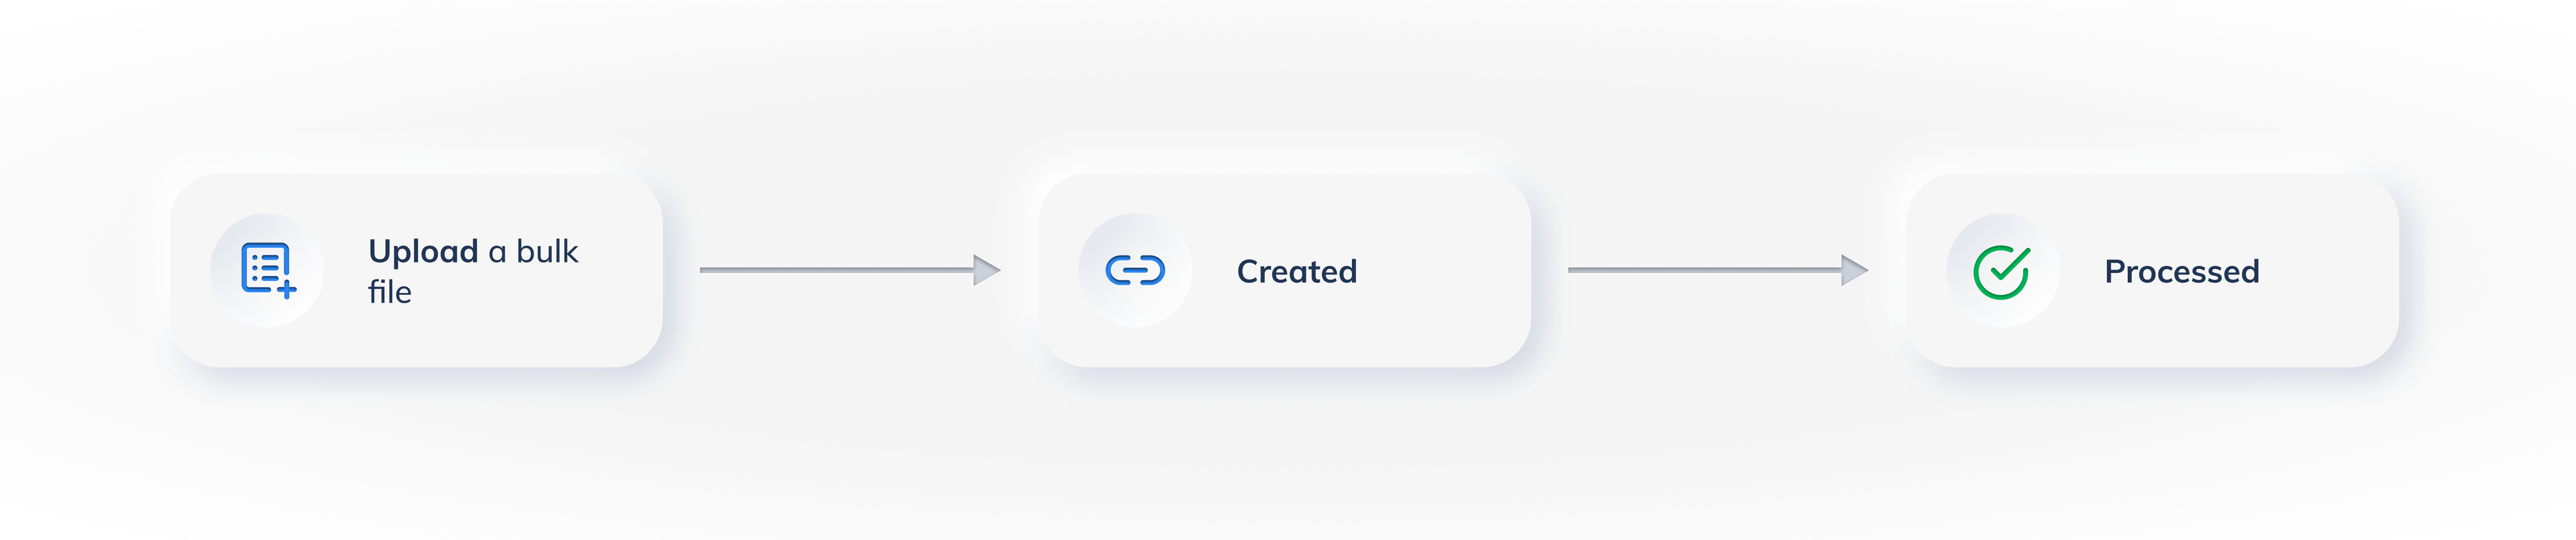
After a bulk upload file is uploaded, it moves through the following states:
This is the initial state of the bulk upload. This indicates that the bulk upload is created in the RazorpayX database and is ready to be processed. No processing is done at this point.
This is the final state of a bulk upload where the uploaded details are processed.
Watch Out!
The processed state means the bulk file was fully processed. To check the status of the individual payout links, download the Bulk Payout Links Report.
A Payout Link created using the bulk upload feature can have the following statuses during its life cycle:
issuedprocessingprocessedcancelledexpired
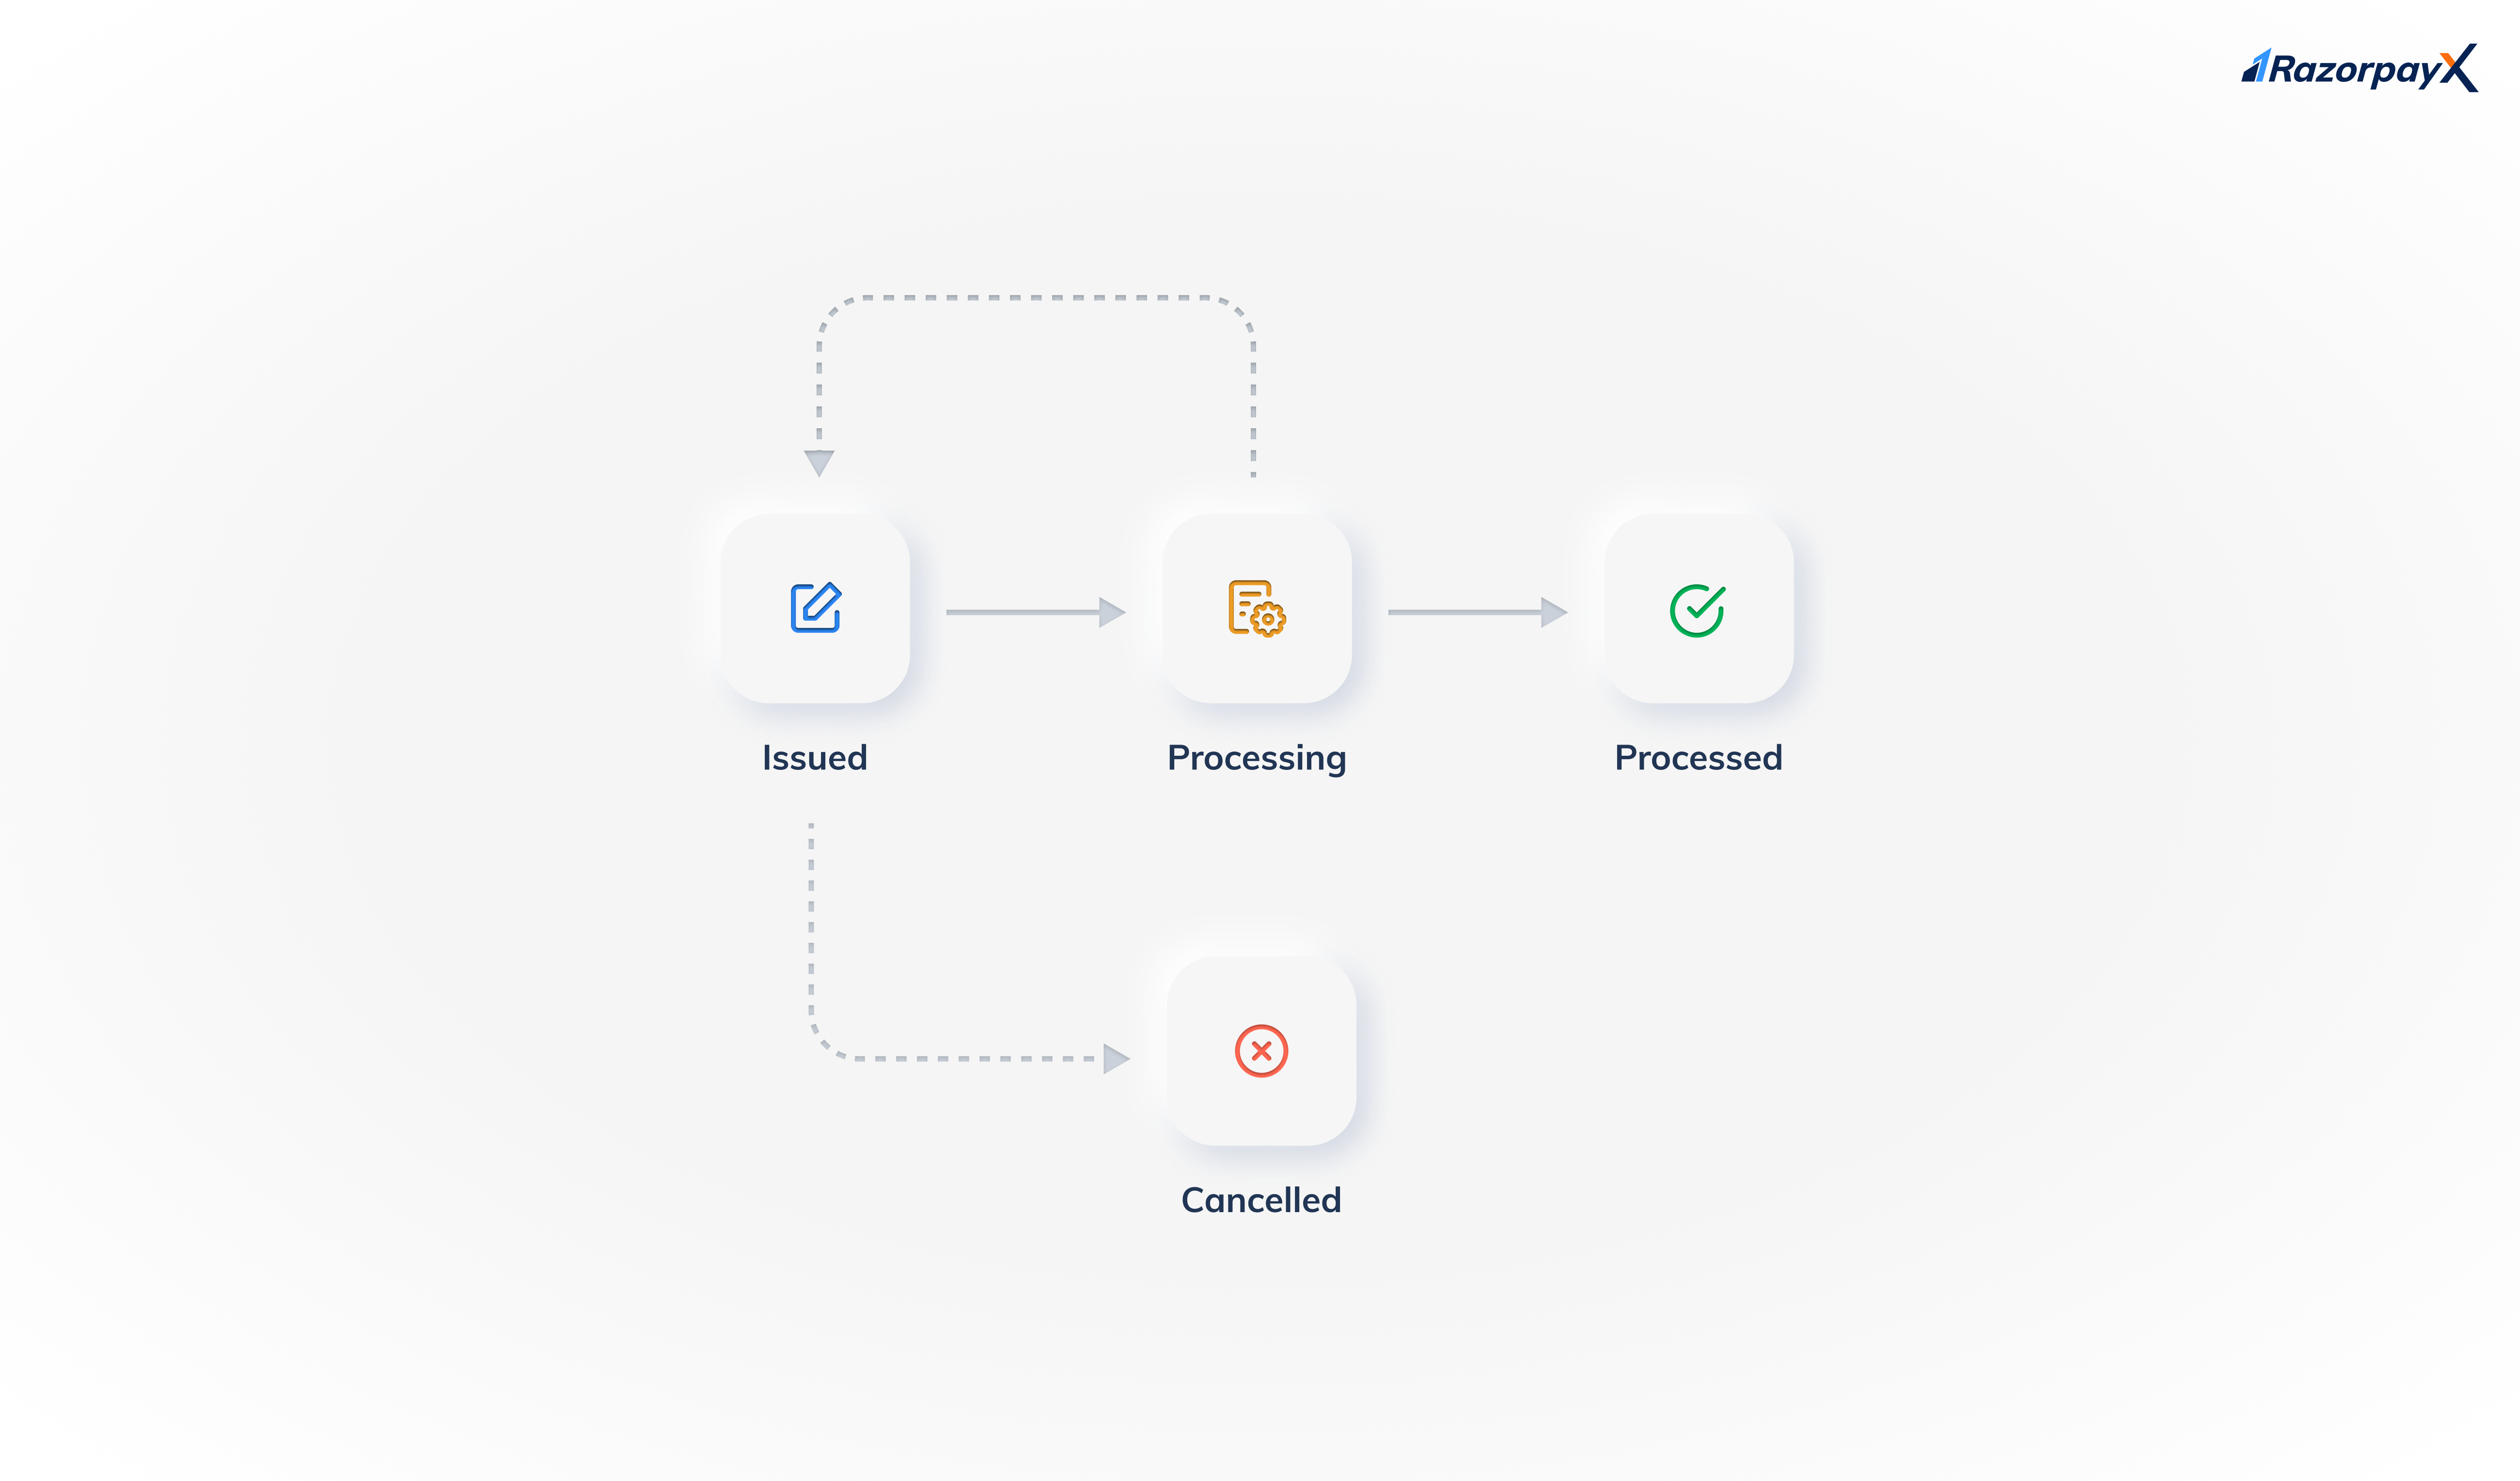
Know more about Payout Link States and Payout States.
After a bulk upload is processed, you can download the processed bulk report from the Dashboard. The report has the following additional fields that you can check to see if the individual payouts were created and processed.
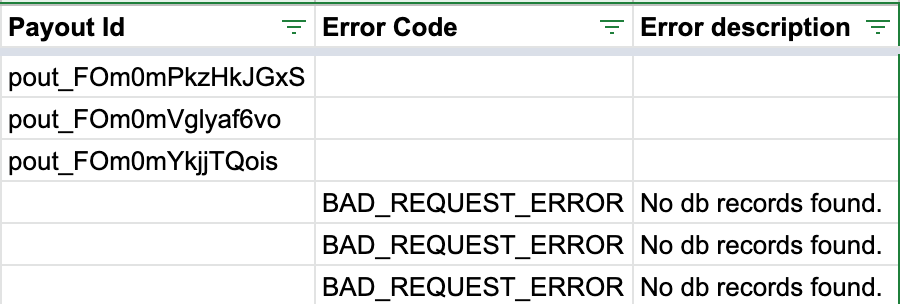
Payout Idstring Unique identifier for the payout. Populated if the payout is successfully created. For example, pout_FMfjLUuRS9Hlzc.Error Codestring The error code for the failure. For example, BAD_REQUEST_ERROR.Error Descriptionstring The reason for the error. For example, No db records found.