Watch Out!
According to PCI regulations, payout processing is allowed on TLS version 1.2 or higher.
RazorpayX will not acknowledge APIs if they are triggered without TLS version 1.2 or higher.
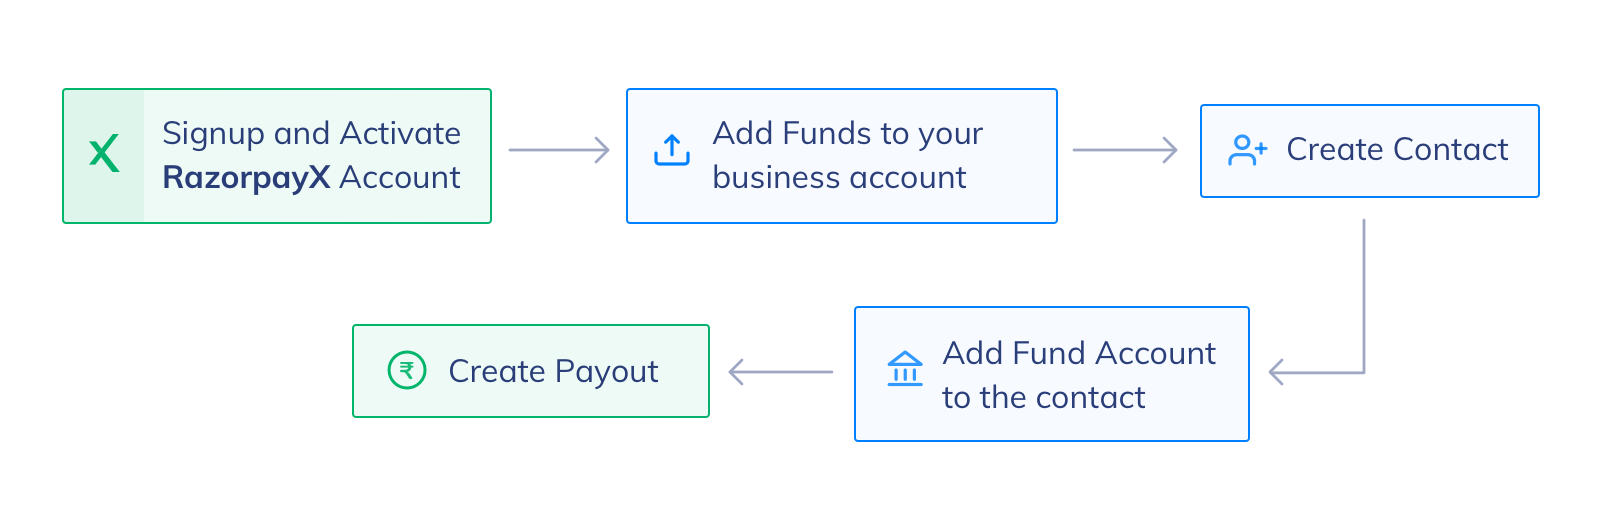
Post sign up, account activation and KYC verification you are eligible to make payouts. To make a payout, you must:
- Create a Contact.
- Add a Fund Account for a contact.
- Create a Payout.
Watch the below video to know how to create Payouts using our APIs.
Handy Tips
It is assumed that you have already added funds to your business account. This action cannot be performed via APIs and has to be done before you can make a payout. Refer to the business account section to know how to add funds to your business account.
RazorpayX test mode is a replication of RazorpayX in a sandbox environment. It allows you to test all aspects of your integration before you go live.
Actions taken in the test mode have no consequences in your live environment. Test mode has its own dummy balance. No real money is used in the test mode.
Contacts, fund accounts and payouts created in the test mode do not appear in the live environment. You can create contacts and fund accounts using real-world or dummy data.
For example, a contact created in the test mode does not carry over to the live mode and vice versa. Payouts made to a fund account in the test mode uses funds from the test account balance, which is not real money.
Know more about Test Mode.
You can try out our APIs on the Razorpay Postman Public Workspace.

Know more about API parameters.
The Razorpay API Gateway URL is https://api.razorpay.com/v1. You need to include this before each API endpoint to make API calls.
Use the URL https://api.razorpay.com/v1/payments to access payment resources.
All RazorpayX APIs are authenticated using Basic Auth. Basic auth requires the following:
[YOUR_KEY_ID][YOUR_KEY_SECRET]
Handy Tips
If you are an existing Razorpay merchant, you can use your existing API key with RazorpayX.
To generate your API Keys:
-
Log into your RazorpayX Dashboard.
-
Navigate to Account Settings → API Keys and Webhooks.
-
Click Generate Key.
-
API Keys are generated for your business account. Click Download Key Details to download your API Keys for future reference.
Watch the short animation below for more information.
Watch Out!
After generating the keys from the Dashboard, download and save them securely. Razorpay does not store <YOUR_KEY_SECRET>. This is visible only at the time of key generation. If you have already generated your API Key and do not remember it, you will need to re-generate the keys from the Dashboard and replace it in your integration code for RazorpayX and Razorpay Payment Gateway.
Razorpay employs a request rate limiter that limits the number of requests received by the API within a time window. This is to maintain system stability in the event of unintentional high traffic loads.
While integrating with APIs, watch for HTTP status code 429 and build the retry mechanism based on the requirement.
To make the best use of the limits, it is recommended to use an Exponential backoff/stepped backoff strategy to reduce request volume and stay within the limit. It is also recommended to have some randomization within the backoff schedule to avoid the thundering herd effect.