1.1 Install Razorpay NodeJS SDK🔗
Open your project folder and run the following command on your command prompt to install the Razorpay NodeJS SDK:
Copynpm i razorpay
Steps to integrate Razorpay Payment Gateway with Node JS SDK.
Follow the below steps to integrate your NodeJS-based website/app with Razorpay Payment Gateway.
Open your project folder and run the following command on your command prompt to install the Razorpay NodeJS SDK:
Copynpm i razorpay
In your server file, instantiate the Razorpay instance with key_id and key_secret. You should generate the API keys on the Razorpay Dashboard and add them here.
Given below is the command:
Copyvar instance = new Razorpay({
key_id: 'YOUR_KEY_ID',
key_secret: 'YOUR_KEY_SECRET',
});
The resources can be accessed using the instance. All the methods invocations follow the namespaced signature:
Copy// API signature
// {razorpayInstance}.{resourceName}.{methodName}(resourceId [, params])
// example
instance.payments.fetch(paymentId)
Every resource method returns a promise.
Copyinstance.payments.all({
from: '2016-08-01',
to: '2016-08-20'
}).then((response) => {
// handle success
}).catch((error) => {
// handle error
})
If you want to use callbacks instead of promises, every resource method accepts a callback function as the last parameter. The callback function acts as Error First Callbacks.
Copyinstance.payments.all({
from: '2016-08-01',
to: '2016-08-20'
}, (error, response) => {
if (error) {
// handle error
} else {
// handle success
}
})
Razorpay enables you to create orders and link them to payments. Order creation is an essential step as it helps you associate every payment with an order, thus preventing multiple payments.
Orders and payments go hand-in-hand. Once the payment is captured, the order is marked paid.
Orders is a mandatory step if you want to automatically capture payments. Know more about payment capture.
Use the code given below in the server-side to generate orders:
Copyconst Razorpay = require('razorpay');
var instance = new Razorpay({ key_id: 'YOUR_KEY_ID', key_secret: 'YOUR_SECRET' })
var options = {
amount: 50000, // amount in the smallest currency unit
currency: "INR",
receipt: "order_rcptid_11"
};
instance.orders.create(options, function(err, order) {
console.log(order);
});
Copy{
"id": "order_DBJOWzybf0sJbb",
"entity": "order",
"amount": 50000,
"amount_paid": 0,
"amount_due": 39900,
"currency": "INR",
"receipt": "order_rcptid_11",
"status": "created",
"attempts": 0,
"notes": [],
"created_at": 1566986570
}
Here is the list of parameters for creating the order:
amount mandatoryinteger The transaction amount, expressed in the currency subunit, such as paise (in case of INR). For example, for an actual amount of ₹299.35, the value of this field should be 29935.currency mandatorystring The currency in which the transaction should be made. See the list of supported currencies. Length must be of 3 characters.receipt optionalstring Pass the receipt id created for this order. Maximum length 40 characters.notes optionaljson object Key-value pair used to store additional information about the entity. Maximum 15 key-value pairs, 256 characters (maximum) each. For example, "note_key": "Beam me up Scotty”.partial_payment optionalboolean Indicates whether the customer can make a partial payment. Possible values:
true: The customer can make partial payments.false (default): The customer cannot make partial payments.When the order is created successfully, an order_id is returned in the response. You need to store against the order defined in your system.
Add the following code in the front-end:
Copyvar orderId ;
$(document).ready(function(){
var settings = {
"url": "/create/orderId",
"method": "POST",
"timeout": 0,
"headers": {
"Content-Type": "application/json"
},
"data": JSON.stringify({
"amount": "50000"
}),
};
//creates new orderId everytime
$.ajax(settings).done(function (response) {
orderId=response.orderId;
console.log(orderId);
$("button").show();
});
});
Add the Razorpay Checkout options in your project. For example, if you are using HTML for your frontend, create a page called index.jsp and add the Pay button on your web page using the checkout code, Handler Function or Callback URL.
Handler Function | Callback URL |
|---|---|
When you use this:
| When you use this:
|
Copy<button id="rzp-button1">Pay</button>
<script src="https://checkout.razorpay.com/v1/checkout.js"></script>
<script>
var options = {
"key": "YOUR_KEY_ID", // Enter the Key ID generated from the Dashboard
"amount": "50000", // Amount is in currency subunits. Default currency is INR. Hence, 50000 refers to 50000 paise
"currency": "INR",
"name": "Acme Corp",
"description": "Test Transaction",
"image": "https://example.com/your_logo",
"order_id": "order_IluGWxBm9U8zJ8", //This is a sample Order ID. Pass the `id` obtained in the response of Step 1
"handler": function (response){
alert(response.razorpay_payment_id);
alert(response.razorpay_order_id);
alert(response.razorpay_signature)
},
"prefill": {
"name": "Gaurav Kumar",
"email": "gaurav.kumar@example.com",
"contact": "9999999999"
},
"notes": {
"address": "Razorpay Corporate Office"
},
"theme": {
"color": "#3399cc"
}
};
var rzp1 = new Razorpay(options);
rzp1.on('payment.failed', function (response){
alert(response.error.code);
alert(response.error.description);
alert(response.error.source);
alert(response.error.step);
alert(response.error.reason);
alert(response.error.metadata.order_id);
alert(response.error.metadata.payment_id);
});
document.getElementById('rzp-button1').onclick = function(e){
rzp1.open();
e.preventDefault();
}
</script>
Copy<button id="rzp-button1">Pay</button>
<script src="https://checkout.razorpay.com/v1/checkout.js"></script>
<script>
var options = {
"key": "YOUR_KEY_ID", // Enter the Key ID generated from the Dashboard
"amount": "50000", // Amount is in currency subunits. Default currency is INR. Hence, 50000 refers to 50000 paise
"currency": "INR",
"name": "Acme Corp",
"description": "Test Transaction",
"image": "https://example.com/your_logo",
"order_id": "order_IluGWxBm9U8zJ8", //This is a sample Order ID. Pass the `id` obtained in the response of Step 1
"callback_url": "https://eneqd3r9zrjok.x.pipedream.net/",
"prefill": {
"name": "Gaurav Kumar",
"email": "gaurav.kumar@example.com",
"contact": "9999999999"
},
"notes": {
"address": "Razorpay Corporate Office"
},
"theme": {
"color": "#3399cc"
}
};
var rzp1 = new Razorpay(options);
document.getElementById('rzp-button1').onclick = function(e){
rzp1.open();
e.preventDefault();
}
</script>
Handy Tips
Test the integration using these test cards.
key mandatorystring API Key ID generated from the Razorpay Dashboard.
amount mandatoryinteger The amount to be paid by the customer in currency subunits. For example, if the amount is ₹100, enter 10000.
currency mandatorystring The currency in which the payment should be made by the customer. See the list of supported currencies.
name mandatorystring The business name shown on the Checkout form.
description optionalstring Description of the purchase item shown on the Checkout form. Must start with an alphanumeric character.
image optionalstring Link to an image (usually your business logo) shown on the Checkout form. Can also be a base64 string, if loading the image from a network is not desirable.
order_id mandatorystring Order ID generated via Razorpay Orders API.
prefillobject You can prefill the following details at Checkout.
name optionalstring Cardholder's name to be pre-filled if customer is to make card payments on Checkout.email optionalstring Email address of the customer.contact optionalstring Phone number of the customer. The expected format of the phone number is + {country code}{phone number}. If the country code is not specified, 91 will be used as the default value. This is particularly important while prefilling contact of customers with phone numbers issued outside India. Examples:
+91 is added to it as +919977665544.method optionalstring Pre-selection of the payment method for the customer. Will only work if contact and email are also pre-filled. Possible values
cardnetbankingwalletemiupinotes optionalobject Set of key-value pairs that can be used to store additional information about the payment. It can hold a maximum of 15 key-value pairs, each 256 characters long (maximum).
themeobject Thematic options to modify the appearance of Checkout.
hide_topbar optionalboolean Used to display or hide the top bar on the Checkout form. This bar shows the selected payment method, phone number and gives the customer the option to navigate back to the start of the Checkout form. Possible values are:
true: Hides the top barfalse (default): Displays the top bar.color optionalstring Enter your brand colour's HEX code to alter the appearance of Checkout form.backdrop_color optionalstring Enter a HEX code to change the Checkout's backdrop colour.modalobject Options to handle the Checkout modal.
backdropclose optionalboolean Indicates whether clicking the translucent blank space outside the Checkout form should close the form. Possible values are:
true: Closes the form when your customer clicks outside the checkout form.false (default): Does not close the form when customer clicks outside the checkout form.escape optionalboolean Indicates whether pressing the escape key should close the Checkout form. Possible values are:
true (default): Closes the form when the customer presses the escape key.false: Does not close the form when the customer presses the escape key.handleback optionalboolean Determines whether Checkout must behave similar to the browser when back button is pressed. Possible values:
true (default): Checkout behaves similarly to the browser. That is, when the browser's back button is pressed, the Checkout also simulates a back press. This happens as long as the Checkout modal is open.false: Checkout does not simulate a back press when browser's back button is pressed.confirm_close optionalboolean Determines whether a confirmation dialog box should be shown when customers attempt to close Checkout. Possible values:
true: Confirmation dialog box is shown.false (default): Confirmation dialog box is not shown.ondismiss optionalfunction Used to track the status of Checkout. You can pass a modal object with ondismiss: function(){} as options. This function is called when the modal is closed by the user.animation optionalboolean Show an animation before loading of Checkout.
true(default): Animation appears.false: Animation does not appear.subscription_id optionalstring If you are accepting recurring payments using Razorpay Checkout, you should pass the relevant subscription_id to the Checkout. Know more about Subscriptions on Checkout.
subscription_card_change optionalboolean Permit or restrict customer from changing the card linked to the subscription. You can also do this from the hosted page. Possible values:
true: Allow the customer to change the card from Checkout.false (default): Do not allow the customer to change the card from Checkout.recurring optionalboolean Determines if you are accepting recurring (charge-at-will) payments on Checkout via instruments such as emandate, paper NACH and so on. Possible values:
true: You are accepting recurring payments.false (default): You are not accepting recurring payments.callback_url optionalstring Customers will be redirected to this URL on successful payment. Ensure that the domain of the Callback URL is whitelisted.
redirect optionalboolean Determines whether to post a response to the event handler post payment completion or redirect to Callback URL. callback_url must be passed while using this parameter. Possible values:
true: Customer is redirected to the specified callback URL in case of payment failure.false (default): Customer is shown the Checkout popup to retry the payment.customer_id optionalstring Unique identifier of customer. Used for:
timeout optionalinteger Sets a timeout on Checkout, in seconds. After the specified time limit, customer will not be able to use Checkout.
remember_customer optionalboolean Determines whether to allow saving of cards. Can also be configured via the Razorpay Dashboard. Possible values:
true: Enables card saving feature.false (default): Disables card saving feature.readonlyobject Marks fields as read-only.
contact optionalboolean Used to set the contact field as readonly. Possible values:
- true: Customer will not be able to edit this field.
- false (default): Customer will be able to edit this field.email optionalboolean Used to set the email field as readonly. Possible values:
- true: Customer will not be able to edit this field.
- false (default): Customer will be able to edit this field.name optionalboolean Used to set the name field as readonly. Possible values:
- true: Customer will not be able to edit this field.
- false (default): Customer will be able to edit this field.send_sms_hash optionalboolean Used to auto-read OTP for cards and net banking pages. Applicable from Android SDK version 1.5.9 and above. Possible values:
true: OTP is auto-read.false (default): OTP is not auto-read.allow_rotation optionalboolean Used to rotate payment page as per screen orientation. Applicable from Android SDK version 1.6.4 and above. Possible values:
true: Payment page can be rotated.false (default): Payment page cannot be rotated.retry optionalobject Parameters that enable retry of payment on the checkout.
enabledboolean Determines whether the customers can retry payments on the checkout. Possible values:
true (default): Enables customers to retry payments.false: Disables customers from retrying the payment.max_countinteger The number of times the customer can retry the payment. Recommended to set this to 4. Having a larger number here can cause loops to occur.config optionalobject Parameters that enable configuration of checkout display language.
displayobject Child parameter that enables configuration of checkout display language.
languagestring The language in which checkout should be displayed. Possible values:
en: Englishben: Bengalihi: Hindimar: Marathiguj: Gujaratitam: Tamiltel: TeluguMultiple payment methods are available on Razorpay Standard Checkout.
The way the Payment Success and Failure scenarios are handled depends on the Checkout Sample Code you used in the last step.
If you used the sample code with the handler function:
On Payment Success
The customer sees your website page. The checkout returns the response object of the successful payment (razorpay_payment_id, razorpay_order_id and razorpay_signature). Collect these and send them to your server.
On Payment Failure
The customer is notified about payment failure and asked to retry the payment. Know about the error parameters.
Copy"handler": function (response){
alert(response.razorpay_payment_id);
alert(response.razorpay_order_id);
alert(response.razorpay_signature)}
Copyrzp1.on('payment.failed', function (response){
alert(response.error.code);
alert(response.error.description);
alert(response.error.source);
alert(response.error.step);
alert(response.error.reason);
alert(response.error.metadata.order_id);
alert(response.error.metadata.payment_id);
}
If you used the sample code with the callback URL:
On Payment Success
Razorpay makes a POST call to the callback URL with the razorpay_payment_id, razorpay_order_id and razorpay_signature in the response object of the successful payment. Only successful authorisations are auto-submitted.
On Payment Failure
In case of failed payments, the checkout is displayed again to facilitate payment retry.
A successful payment returns the following fields to the Checkout form.
You need to store these fields in your server.
You can confirm the authenticity of these details by verifying the signature in the next step.
Copy{
"razorpay_payment_id": "pay_29QQoUBi66xm2f",
"razorpay_order_id": "order_9A33XWu170gUtm",
"razorpay_signature": "9ef4dffbfd84f1318f6739a3ce19f9d85851857ae648f114332d8401e0949a3d"
}
razorpay_payment_idstring Unique identifier for the payment returned by Checkout only for successful payments.razorpay_order_idstring Unique identifier for the order returned by Checkout.razorpay_signaturestring Signature returned by the Checkout. This is used to verify the payment.This is a mandatory step that allows you to confirm the authenticity of the details returned to the checkout for successful payments.
To verify the razorpay_signature returned to you by the checkout:
Create a signature in your server using the following attributes:
order_id - Retrieve the order_id from your server. Do not use the razorpay_order_id returned by checkout.razorpay_payment_id - Returned by checkout.key_secret - Available in your server.key_secret that was generated from the Razorpay Dashboard.Use the SHA256 algorithm, the razorpay_payment_id and the order_id to construct a HMAC hex digest as shown below:
Copygenerated_signature = hmac_sha256(order_id + "|" + razorpay_payment_id, secret);
if (generated_signature == razorpay_signature) {
payment is successful
}
If the signature you generate on your server matches the razorpay_signature returned to you by the checkout, the payment received is from an authentic source.
Copyapp.post("/api/payment/verify",(req,res)=>{
let body=req.body.response.razorpay_order_id + "|" + req.body.response.razorpay_payment_id;
var crypto = require("crypto");
var expectedSignature = crypto.createHmac('sha256', '<YOUR_API_SECRET>')
.update(body.toString())
.digest('hex');
console.log("sig received " ,req.body.response.razorpay_signature);
console.log("sig generated " ,expectedSignature);
var response = {"signatureIsValid":"false"}
if(expectedSignature === req.body.response.razorpay_signature)
response={"signatureIsValid":"true"}
res.send(response);
});
app.listen(port, () => {
console.log(`Example app listening at http://localhost:${port}`)
})
Add the following code in the frontend:
Copy var settings = {
"url": "/api/payment/verify",
"method": "POST",
"timeout": 0,
"headers": {
"Content-Type": "application/json"
},
"data": JSON.stringify({response}),
}
This completes the integration.
You can track the payment status from the Razorpay Dashboard, subscribe to the Webhook event or poll our APIs.
payment_ID has been generated and note the status. In case of a successful payment, the status is marked as captured.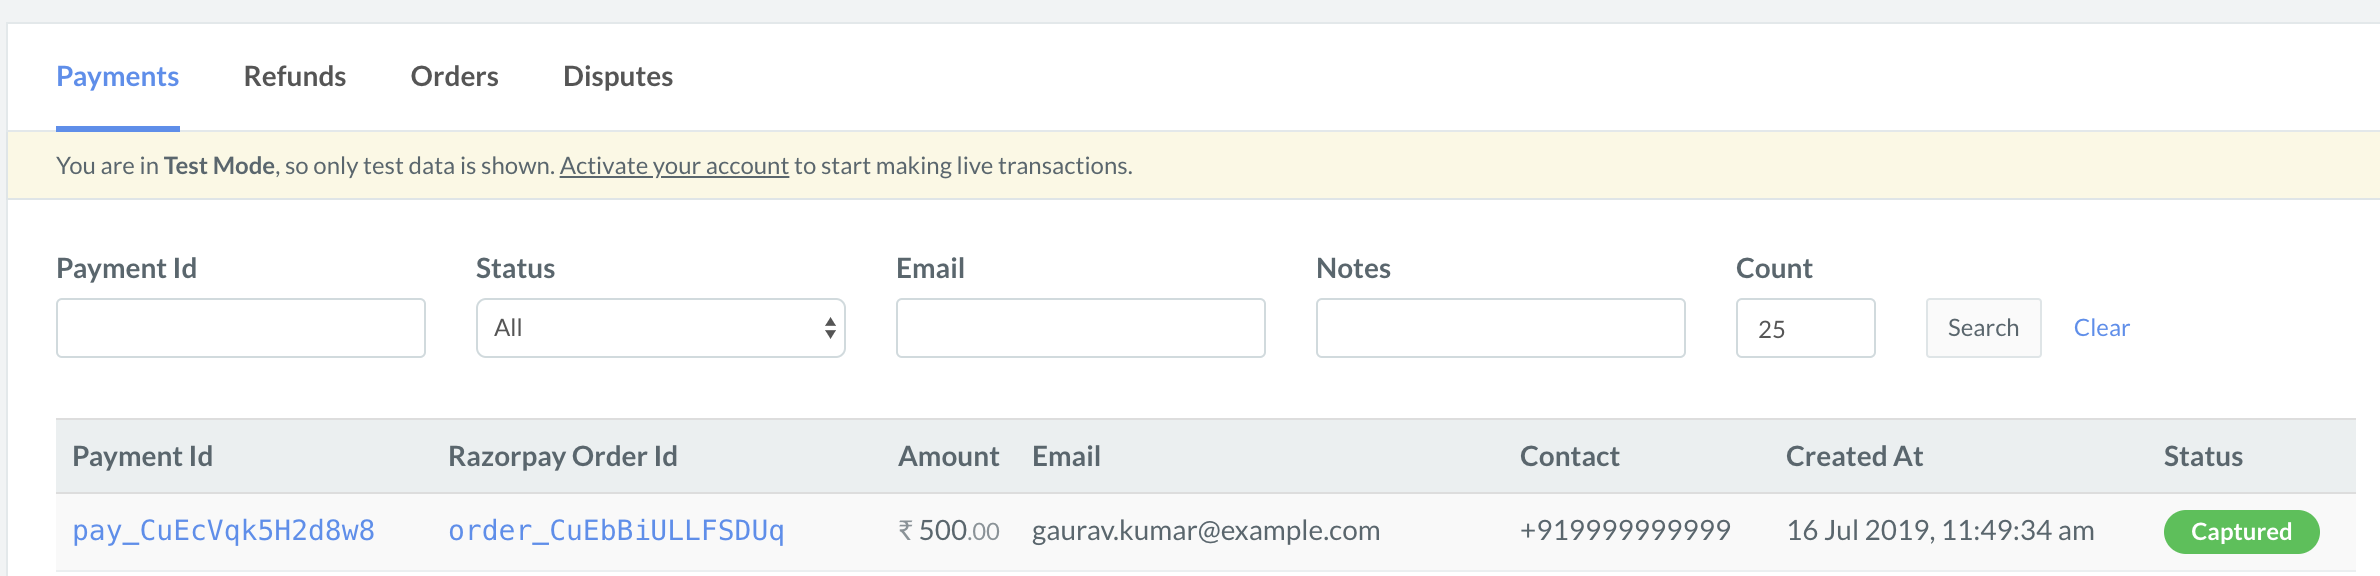
You can use Razorpay Webhooks to configure and receive notifications when a specific event occurs. When one of these events is triggered, we send an HTTP POST payload in JSON to the webhook's configured URL. Know how to set up Webhooks.
If you have subscribed to the order.paid webhook event, you will receive a notification every time a customer pays you for an order.
Poll Payment APIs to check the payment status.
Step 2: Test Integration
ON THIS PAGE