FAQs
Find answers to the frequently asked questions about Razorpay Payment Button.
Yes, you can embed Razorpay Payment Button on custom-built websites as well as those built on popular platforms such as Weebly, Wix, Blogger, Google Sites and so on.
You will be able to embed the button on mobile apps, provided:
- The app-development platform supports JS.
- The app is able to make the Button open in a webview.
To make your your business logo appear on the Checkout modal:
- In the Razorpay Dashboard, navigate to Settings.
- Under Account Settings, in the Your Logo section, click Choose File.
- Upload the logo file. Ensure that the logo is a square image of minimum dimensions 256x256 px. Maximum file size allowed is 1MB.
You can make the Payment Button and Checkout elements appear in your brand colours. To do this:
- In the Razorpay Dashboard, navigate to Settings.
- Under Account Settings, in the Theme Color section, enter the HEX code for your brand. For example,
#6822CC.
- Click Save Changes.
Once this is done, during button creation ensure that in the Button Details section, you select Brand Color in Button Theme field.
While creating the amount field, ensure that you select Item with Quantity as the type. This adds the quantity counter, which the customer can use to add or reduce quantity. If you have already created the amount field without this option, you must delete the field and recreate it with Item has quantity type selected.
While creating the amount field, select the Customers Decide Amount type. Once the button is published, in the customer view, the field appears with a blank space where the customer can enter the amount.
You can update the stock in two ways:
List of Payment Button:
- Log into your Dashboard, navigate to Payment Button and click the relevant Id. The items appear on the top of the page, on the right.
- Click Update Stock and enter the number of units available for sale in the field.
- Click Update.
Payment Button Edit Mode:
- Log into your Dashboard, navigate to Payment Button and click the relevant Id.
- Click the edit icon.
- In the Amount Details section, go to the amount field and click the edit icon.
- Enter the number of units available for sale in the field.
- Click Add.
This depends on the amount field's configuration. If the amount field is mandatory, then when it goes out-of-stock, the Payment Button will become inactive. Customers would not be able to access this button to make payments.
As long as there is at least one amount field (mandatory or optional) that has stock, the button remains active.
No, you cannot configure amount fields to have different currencies. When you attempt to configure the second amount field with a different currency, a message appears on the screen highlighting that only one currency can be applied.
You can embed the payment button on your website to collect payments from your customers.
To do this:
- Go to Razorpay Dashboard → Payment Button.
- In the list that appears, navigate to the relevant button and copy the button code.
- In your website code, paste this code on the page where you want the payment button to appear.
You can view the payments as and when they are made in the Transactions Details View of the Payment Button.
You will receive the payments in your bank account as per the settlement cycle. By default, this is T+2 for domestic payments and T+7 for international payments.
All the payment methods enabled for your account are displayed on the Checkout. The default payment methods available are:
- Cards
- Netbanking
- UPI
- Wallets (FreeCharge and PayZapp)
Raise a request on the Dashboard to display more payment methods on Checkout.
By default, a customer can make a maximum payment of ₹5,00,000. This can be raised by raising a request with Razorpay Support.
You can accept payments in international currency using Payment Button. Refer to the list of supported currencies. Follow these steps:
- Raise a request with Razorpay Support to enable international payments for your account.
- While creating the Payment Button, click the currency dropdown in the amount field and select the required currency.
One Currency per Button:
You can set only one currency for amount fields on a Payment Button. If you attempt to configure the second amount field with a different currency, a message appears on the screen highlighting that more than one currency cannot be applied.
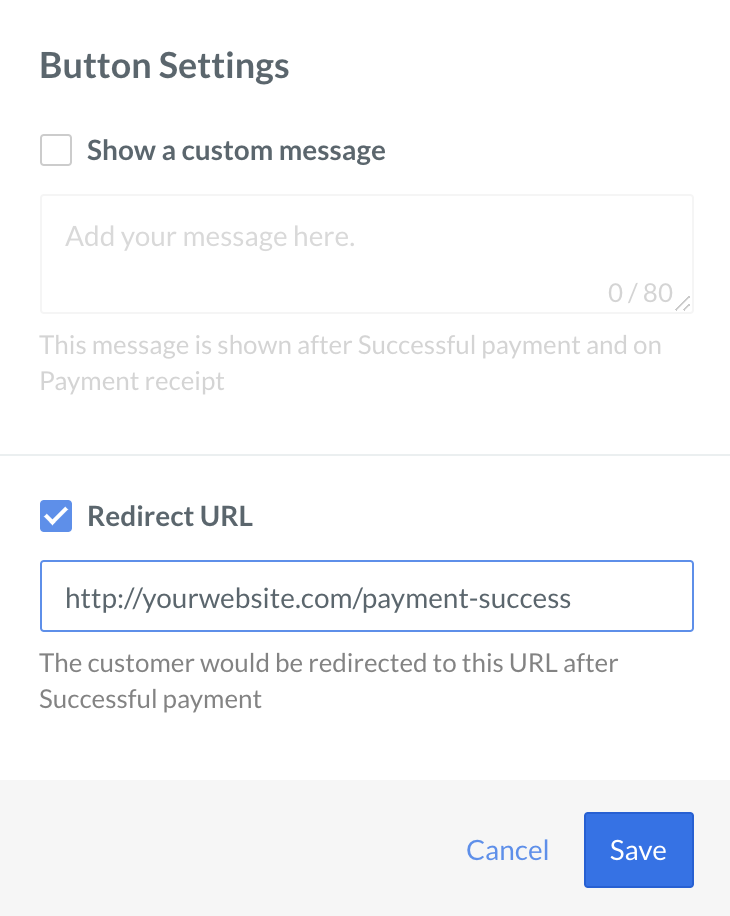
You can redirect your customers to another page after they complete a payment.
To redirect your customers:
- On the Button Created Successfully pop-up page, click Configure against Redirect URL and Custom Message.
- On the pop-up page, enable Redirect URL.
- Add the redirect URL in the field.
- Click Save.