Create Payment Links in Batches
Generate Razorpay Payment Links in bulk using the Batch Upload feature.
You can generate and process Payment Links in batches on the Dashboard, saving time and eliminating the hassle of creating multiple individual links.
Feature Request
This is an on-demand feature. Please raise a request with our Support team to get this feature activated on your Razorpay account.
Step 1: Download Batch File Format🔗
Download the sample batch file from the Dashboard. The batch file is a simple .xlsx or .csv file.
Step 2: Add Payment Details in Batch File🔗
Handy Tips
- The size of a batch file can be up to 10 MB. You can add up to 50,000 rows in a particular file. The Payment Links are processed in the same sequence as listed in the file.
- The Field names/headers in a batch should not be modified. Modifications can cause upload failure.
Watch this video to see how to add payment details in the batch file.
The batch file contains all the necessary details to create Payment Links. Given below are the required fields for creating a batch file:
Reference Idoptional- Enter a unique number for each Payment Link. This is mapped to the
receiptvalue provided while creating an Order at your server-side. This field has a limit of 40 characters. Customer Nameoptional- Name of the customer. This field has a limit of 40 characters.
Customer Emailoptional- Email address of the customer.
Customer Contactoptional- Contact number of the customer. You can enter domestic as well as international numbers. The expected format of the phone number is
+ {country code}{phone number}. If the country code is not specified,91will be used as the default value. Currencyoptional- Defaults to
INR. We also accept payments in international currencies. Amountmandatory- Amount to be paid by the customer in currency subunits. That is, if currency selected is 'INR', the amount must be in paise. For example, enter 29995 for an amount of ₹299.95.
Descriptionmandatory- Brief description of the Payment Link.
Expire byoptional- Date and Time at which the Payment Link expires. Supported formats:
DD-MM-YYYY HH:mm:ss(For example, 14-12-2018 18:45:00)DD-MM-YYYY HH:mmDD-MM-YYYY Partial Paymentoptional- Indicates whether partial payments are enabled. Set to
1to enable partial payments and0to disable.Handy Tips
Partial payments are not allowed for UPI Payment Links. First Payment Min Amount (In Paise)optional- Minimum amount to be paid by the customer as the first partial payment. For example, if an amount of ₹7,000 is to be received from the customer in two installments of #1 - ₹5,000, #2 - ₹2,000, you can set this value as
500000. Notesoptional- The notes object is a set of key-value pairs used to store additional information about the entity. It can hold a maximum of 15 key-value pairs, each 255 characters long (maximum).
Ensure that the date format does not get modified. Watch this video to see how to fix date formatting issues:
Step 3: Upload Batch File on Dashboard🔗
Upload Batch File🔗
To upload a batch file:
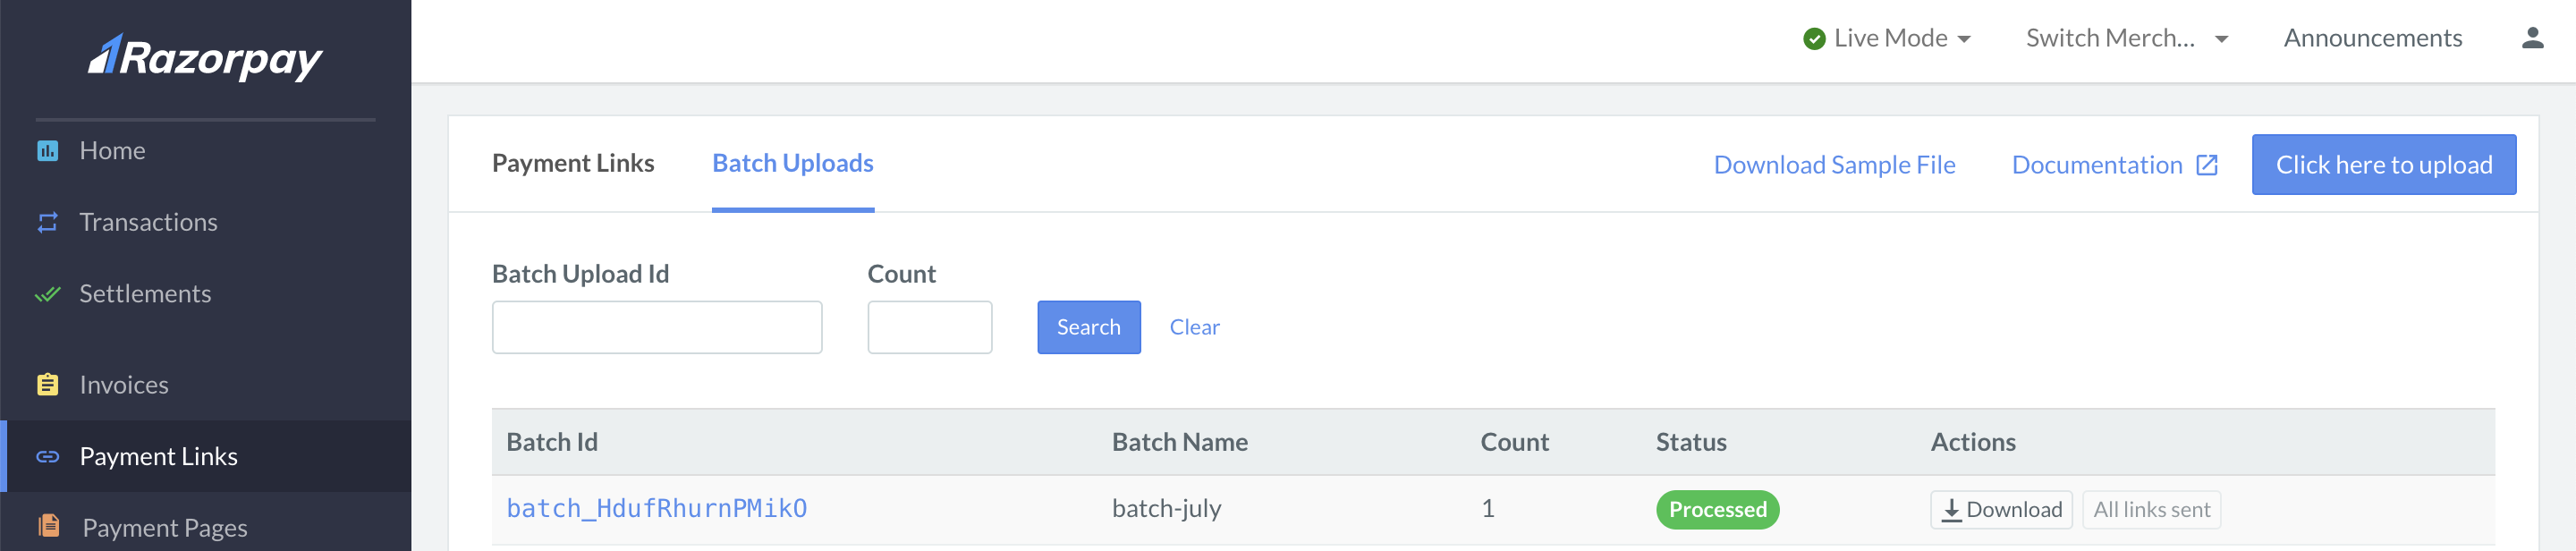
- Navigate to Payment Links → Batch Uploads.
- Click the Click here to upload button.
- On the pop-up page, drag and drop the file over the highlighted area. Alternatively, click the Click to Upload option to select your file from your system.

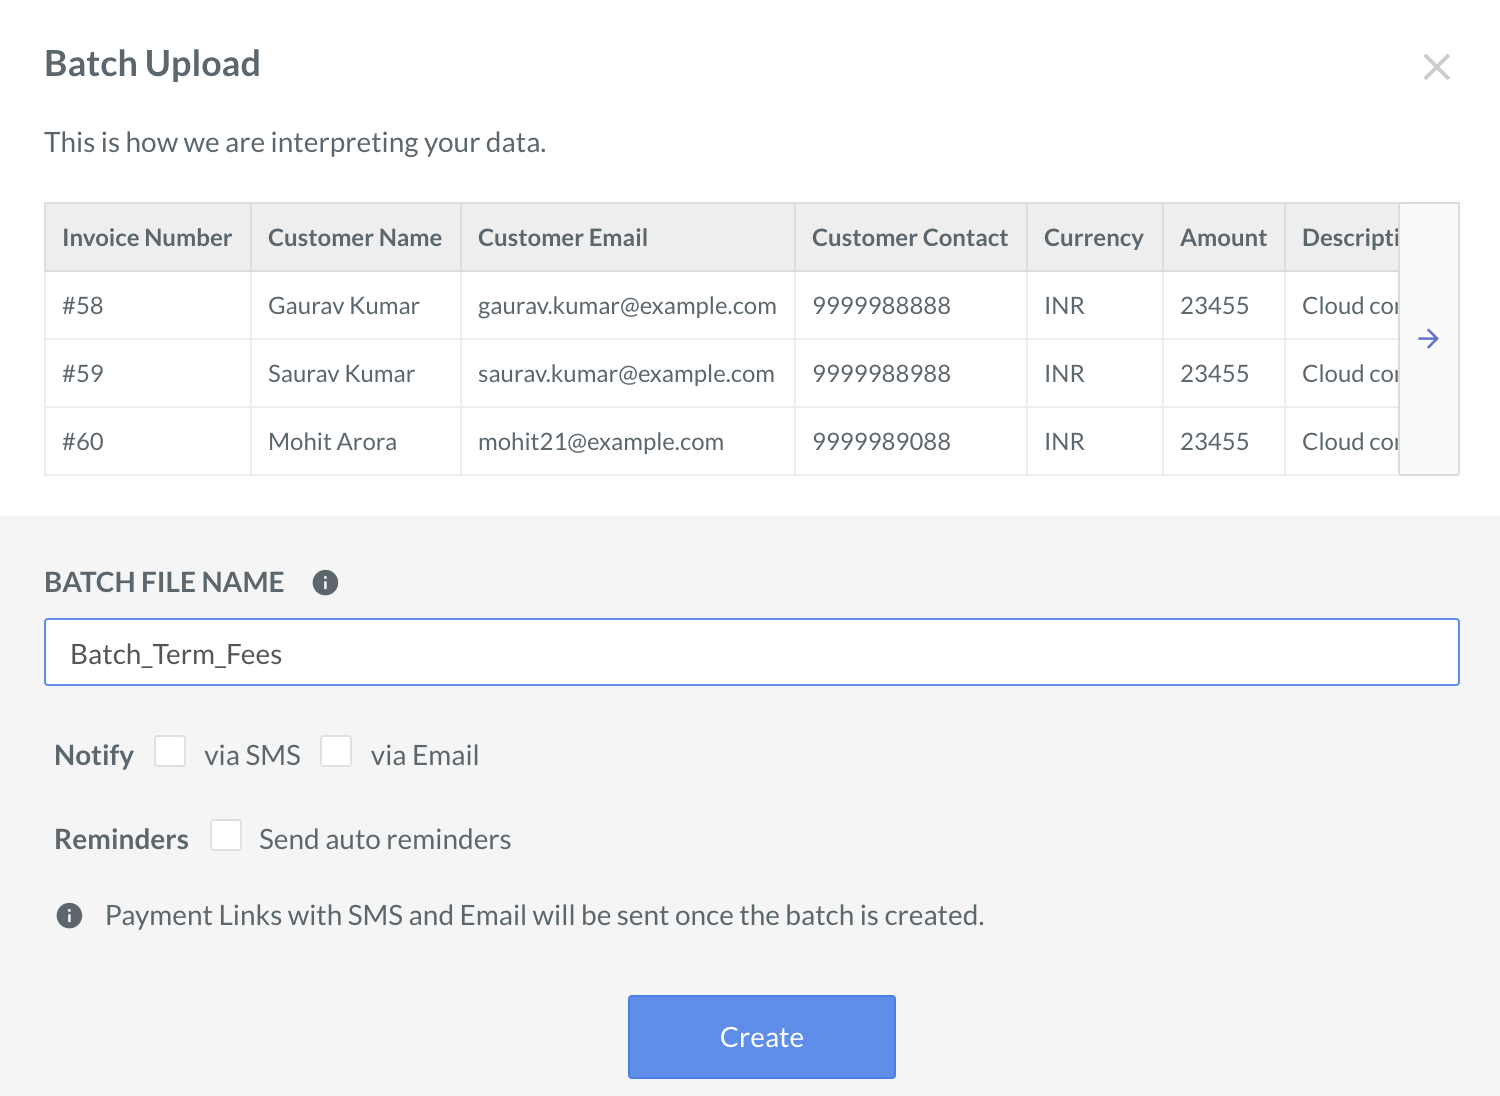
The file is validated and uploaded to the Razorpay server. After the file is successfully uploaded, a snippet view of the file is displayed in the Batch Upload pop-up page.
Add Details to Batch Upload Pop-up Page🔗
To add details to Batch upload:
- Enter a relevant file name in the BATCH FILE NAME field.
- Select Send auto reminders if you want to send automatic reminders for all Payment Links. By default, reminders are not enabled during batch creation of Payment Links.
- Follow these steps to determine whether the links should be sent immediately or later. Also, select the medium of link sharing:
- If you want to send links immediately, select via SMS and/or via Email next to the NOTIFY check box options and click Create.
- If you want to send them later, do not select any medium and click Create.
Step 4: Perform Post-batch Creation Actions🔗
After the batch is created, you can see a Batch Created Successfully pop-up page. Click Close and reload the page. The newly created batch file will appear in the list of Batch Uploads.
The Batch Uploads screen displays the following fields:
Field | Descriptions |
|---|---|
Batch ID | Unique identifier of a batch upload. |
Batch Name | Name of the batch file. |
Count | The number of processed rows in a batch. |
Status | Current state of the batch file. |
Actions | The operations you can perform on a particular batch file. For example, Download Report File and Send all links. |
Batch File States🔗
The batch file states are explained in the table given below:
State | Description |
|---|---|
Created | You have successfully uploaded the file. No action has been performed on the file by us. |
Processing | We are processing the file. |
Processed | The file has been processed by us. |
Handy Tips
- The Processed state does not mean all rows in the file were successfully processed. It just means the file was successfully processed, with or without errors.
- Download the Bulk Upload report to check for errors. You can correct these errors and upload the data again in another file.
To view more details about the batch file:
-
Click the Download button to download the Batch File Report. This report provides you details of the links created. Also, it displays any errors that occurred during the process.
Watch this video to see how to generate the batch file report:
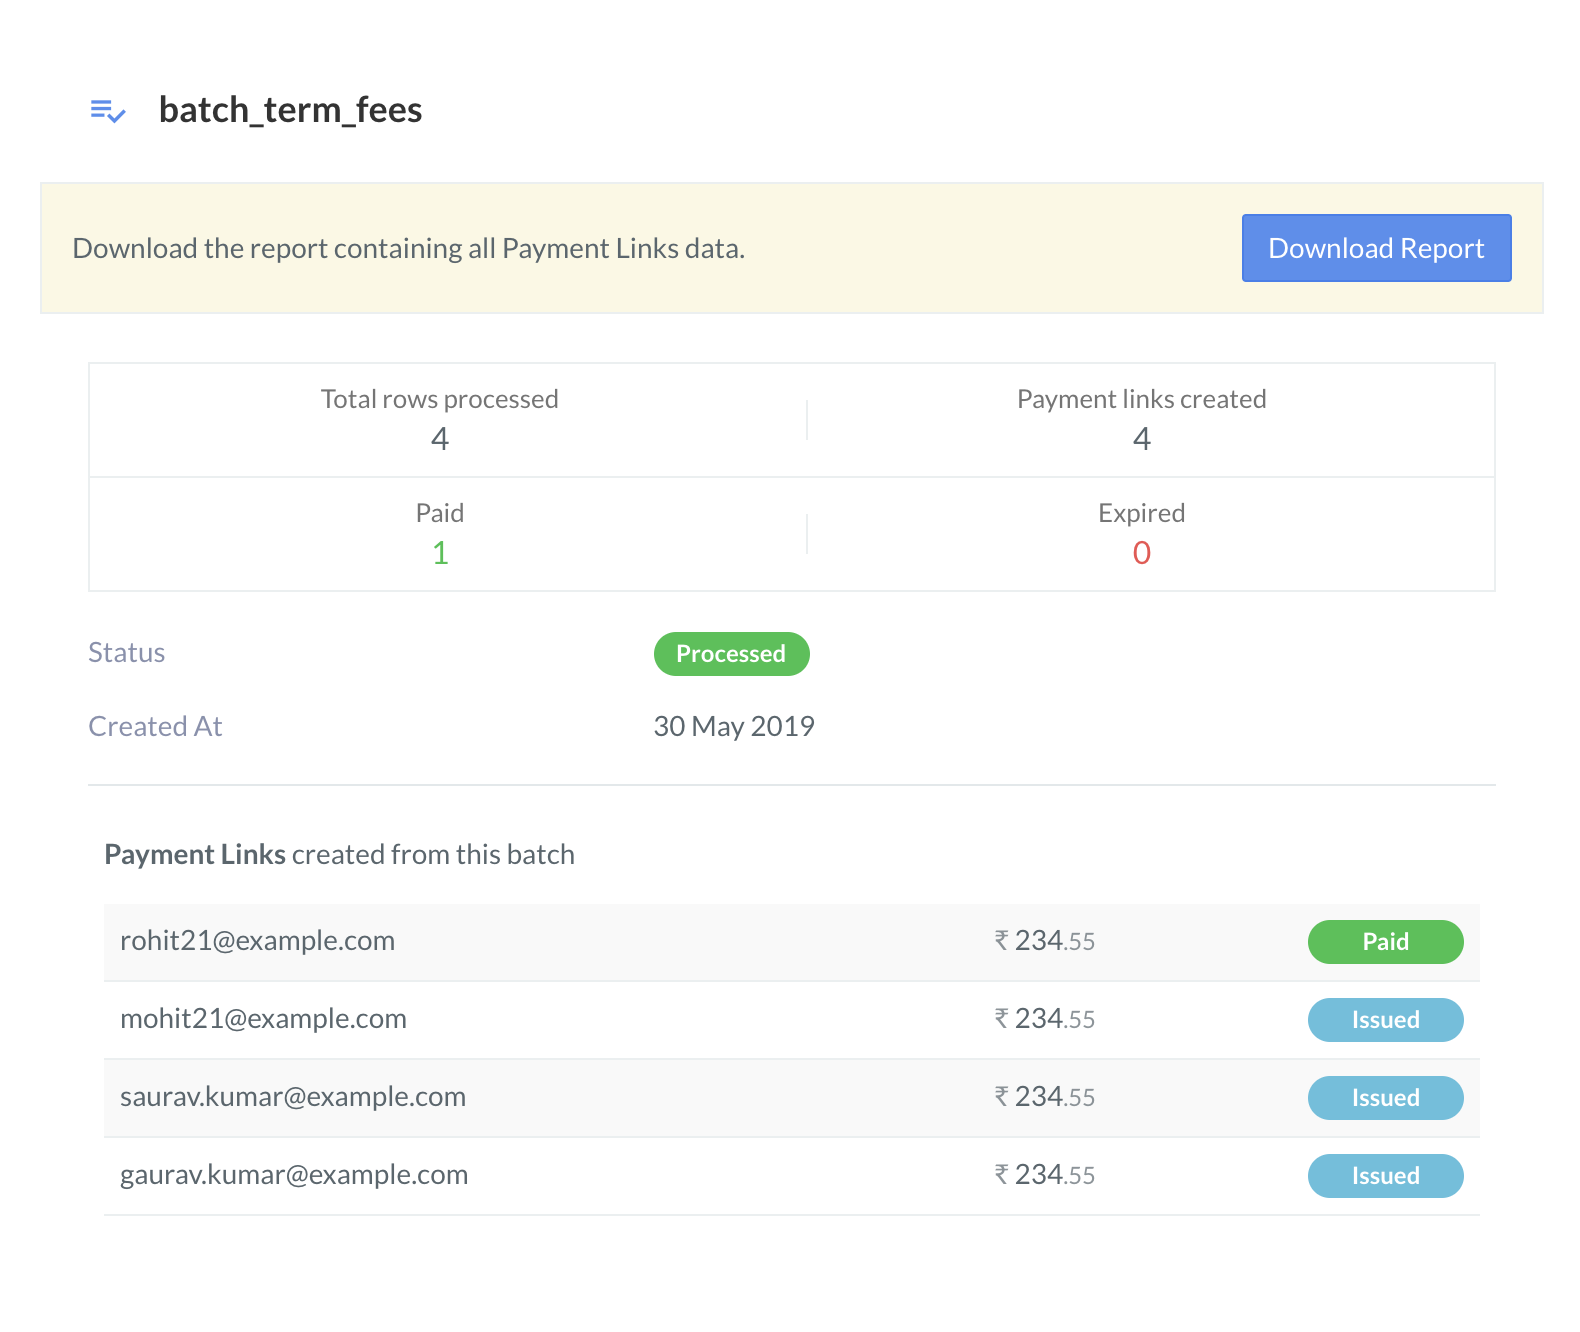
-
Click the Batch ID to view the Total rows processed, Payment Links created, and the number of Paid and Expired links. You can also view the Status and Created At information of the batch. The details of individual Payment Links created from the batch are also displayed here.
Send Unsent Payment Links🔗
After a batch is successfully created and is in the Processed state, you can see either an All links sent or a Send all links option under the Actions based on your notification choice above.
To send the Payment Links:
- Click the Send all links button.
- Select Send SMS and/or Send Email on the Send Reminder? pop-up page that appears.
- Click Yes, Send all. This enables Razorpay to process and issue Payment Links to their respective recipients as defined in the batch file.
Step 5: Handle Errors🔗
Batch file errors are detected during file upload. You can also download the batch file report after the upload to check for errors.
A processed batch file does not necessarily mean that all Payment Links were created successfully. There is a chance that a few Payment Links did not get created because of certain issues in the entered data. For example, data was missing in a few fields.
Download the Batch Report to understand the reason for the error. This contains the following additional fields to help you check if a Payment Link was issued for a row or not.
Additional Fields | Datatype | Description |
|---|---|---|
Status | string/null | This indicates the processing status of the row. It can either be "success" or "failed". |
Payment Link ID | string/null | The unique identifier of the Payment Link. This is null/empty if there are errors during the creation. |
Payment Link Short URL | string/null | The URL of the Payment Link. This is null/empty if there are errors during the creation. |
Error Code | string/null | In case of an error, this column has an error code. |
Error Description | string/null | In case of an error, this column has the error message. |
To fix the errors, make the required changes and re-upload the batch file.
Watch this video to see how to handle errors found on the batch file report.
Related Information🔗
×![]()
ON THIS PAGE