Save Customer Card Details at Standard Checkout

Store customer's card details securely as tokens to repeat transactions made by the customer.


You can save customer card details in the form of tokens with Razorpay. The next time the customer makes any transactions, the customer can pay directly by entering the CVV of the card. This saves the customer the hassle of entering the card details multiple times for each transaction. As per the RBI guidelines, Razorpay will not save sensitive card details; we only save the tokens.

Watch Out!
For a safer and secure payment experience, please advise your customers to log out of the Saved Cards feature after completing the payment. Doing so avoids any misuse of the card information.

Access saved cards

Customer WorkflowπŸ”—

Save Card DetailsπŸ”—

To save card details:

  1. The customers open Razorpay Checkout.

  2. They select Card as the payment method.

  3. They provide the card details and select the Save card securely for future payments option.

    Save
  4. The customers complete the payment.

Make Payments Using Saved CardsπŸ”—

To make payment using saved cards:

  1. The customers log in to the Razorpay Checkout.

  2. They select Card as the payment method.

  3. They enter the OTP received on their phone number and click Verify.

  4. They select the saved card, enter the CVV and click Pay.

  5. We recommend that customers log out of Checkout after they complete the transaction. To do this, they must:

  6. Open Razorpay Checkout.

  7. Select Card as the payment method.

  8. Click the drop-down list and select Log out from all devices.

    Log

Integration WorkflowπŸ”—

  1. Enable Flash Checkout on Razorpay Dashboard.
  2. Create a Customer.
  3. Save Card Details on Checkout.
  4. Create Payments using Saved Card.

Step 1: Enable Flash Checkout on Razorpay DashboardπŸ”—

Flash Checkout enables you to save customer card details on Standard Checkout. Authentication is done using PCI-DSS compliant technology to ensure that all the card information is stored securely.

Know more about Flash Checkout.

Watch this video to see how to enable or disable Flash Checkout:

Step 2: Create a CustomerπŸ”—

Create a customer whose card details should be saved from the Dashboard or using the Customers API. You can create customers with basic details such as email and contact using the following endpoint:

The following endpoint creates or add a customer with basic details such as name and contact details. You can use this API for various Razorpay Solution offerings.

/customers

Request ParametersπŸ”—

name mandatory
string Customer's name. Alphanumeric value with period (.), apostrophe (') and parentheses are allowed. The name must be between 3-50 characters in length. For example, Gaurav Kumar.
contact optional
string The customer's phone number. A maximum length of 15 characters including country code. For example, +919876543210.
email optional
string The customer's email address. A maximum length of 64 characters. For example, gaurav.kumar@example.com.
fail_existing optional
string Possible values:
  • 0: If a customer with the same details already exists, fetches details of the existing customer.
  • 1 (default): If a customer with the same details already exists, throws an error.
gstin optional
string Customer's GST number, if available. For example, 29XAbbA4369J1PA.
notes optional
object This is a key-value pair that can be used to store additional information about the entity. It can hold a maximum of 15 key-value pairs, 256 characters (maximum) each. For example, "note_key": "Beam me up Scotty”.

Know more about Customers API.

Step 3: Save Card Details on CheckoutπŸ”—

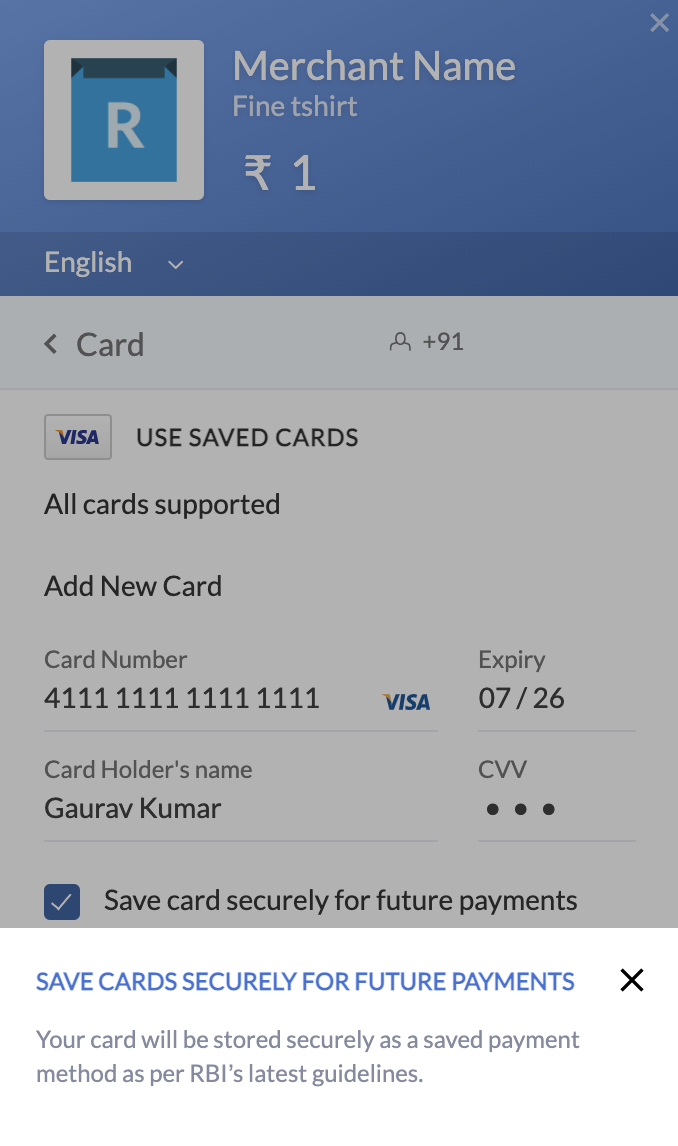
While making the payment, the customer enters the card details in the Checkout form. Pass customer_id and save=1 along with the other parameters into the Checkout form.

WebπŸ”—

Copy<button id="rzp-button1">Pay</button> <script src="https://checkout.razorpay.com/v1/checkout.js"></script> <script> var options = { "key": "<YOUR_KEY_ID>", "amount": "5076", "currency": "INR", "name": "Acme Corp", "description": "Test Transaction", "image": "https://example.com/your_logo", "customer_id": "cust_EYqfYOviw62csf", "prefill":{ "contact":"9988776655", "email":"gaurav.kumar@example.com", "name":"Gaurav Kumar" }, "save": 1, "handler": function (response){ alert(response.razorpay_payment_id); alert(response.razorpay_order_id); alert(response.razorpay_signature) } }; var rzp1 = new Razorpay(options); document.getElementById('rzp-button1').onclick = function(e){ rzp1.open(); e.preventDefault(); } </script>

Know more about Checkout parameters for web integration.

AndroidπŸ”—

For saving the cards, the options dictionary as a JSONObject representation is shown below:

Copy JSONObject payload = new JSONObject(); payload.put("currency", "INR"); payload.put("customer_id", "cust_4lsdkfldlteskf"); payload.put("save", "1"); // And the remaining fields

Know more about Checkout parameters for Android integration.

iOSπŸ”—

For saving the card details on the Checkout, the options dictionary in Swift and Objective C are shown below:

Copyinternal func showPaymentForm(){ let options: [String:Any] = [ "customer_id":"cust_4lsdkfldlteskf", "save":"1", // And the remaining fields ] razorpay.open(options) }
Copy @"customer_id" : @"cust_4lsdkfldlteskf", @"save" : @"1" // And the remaining fields

Know more about other Checkout parameters for iOS integration.

Request ParametersπŸ”—

customer_id mandatory
string Unique identifier of the customer. This can be obtained from the response of the previous step.
save mandatory
boolean Specifies if the card details should be stored as tokens. Possible values:
  • 1: Saves the card details
  • 0 (default): Does not save the card details.

Step 4: Create Payments using Saved CardπŸ”—

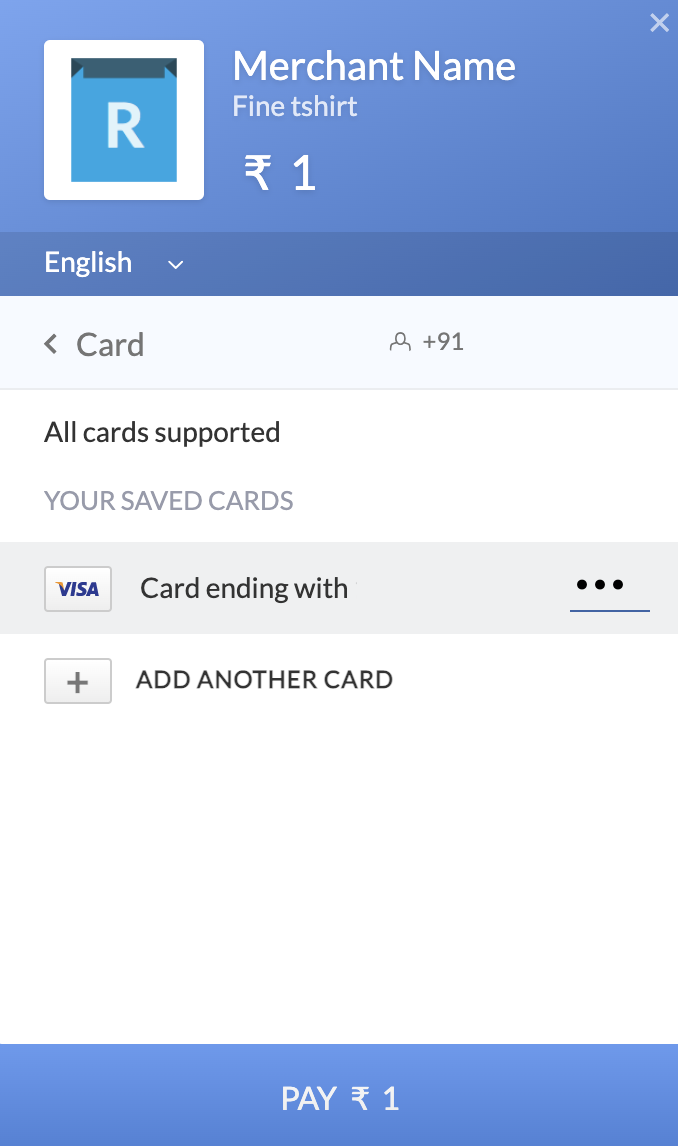
Once the card is saved, customers can complete payments on repeat purchases by only entering the CVV. To fetch saved cards, pass the customer_id to the Checkout form.

WebπŸ”—

Initiate payment by passing customer_id to Checkout along with the other options.

Copy<button id="rzp-button1">Pay</button> <script src="https://checkout.razorpay.com/v1/checkout.js"></script> <script> var options = { "key": "YOUR_KEY_ID", // Enter the Key ID generated from the Dashboard "amount": "50000", // Amount is in currency subunits. Default currency is INR. Hence, 50000 refers to 50000 paise "currency": "INR", "name": "Acme Corp", "description": "Test Transaction", "order_id":"order_CgmcjRh9ti2lP7", "image": "https://example.com/your_logo", "customer_id": "cust_EYqfYOviw62csf", "handler": function (response){ alert(response.razorpay_payment_id); alert(response.razorpay_order_id); alert(response.razorpay_signature) } }; var rzp1 = new Razorpay(options); document.getElementById('rzp-button1').onclick = function(e){ rzp1.open(); e.preventDefault(); } </script>

AndroidπŸ”—

Initiate payment by passing customer_id to Checkout along with the other options.

Copy JSONObject payload = new JSONObject(); payload.put("customer_id", "cust_4lsdkfldlteskf"); // And the remaining fields

iOSπŸ”—

Initiate payment by passing customer_id to Checkout along with the other options.

Copyinternal func showPaymentForm(){ let options: [String:Any] = [ "amount": "100", "currency": "INR",//We support more that 92 international currencies. "description": "purchase description", "order_id": "order_4xbQrmEoA5WJ0G", "image": "https://url-to-image.png", "name": "business or product name", "customer_id":"cust_4lsdkfldlteskf", "prefill": [ "contact": "9797979797", "email": "gaurav.kumar@example.com" ], "theme": [ "color": "#F37254" ] // And the remaining fields ] razorpay.open(options) }
Copy @"amount" : @(2000), @"email" : @"gaurav.kumar@example.com", @"contact" : @"9999912345", @"customer_id" : @"cust_4lsdkfldlteskf" // And the remaining fields

Request ParameterπŸ”—

customer_id mandatory
string Unique identifier of the customer. Created in Step 2.

Remove Saved CardsπŸ”—

Customers can delete their card details by visiting this link and following the on-screen instructions.

FAQsπŸ”—

1. My customers have accessed their saved cards on the Razorpay Checkout by providing OTP. How do they now log out?πŸ”—

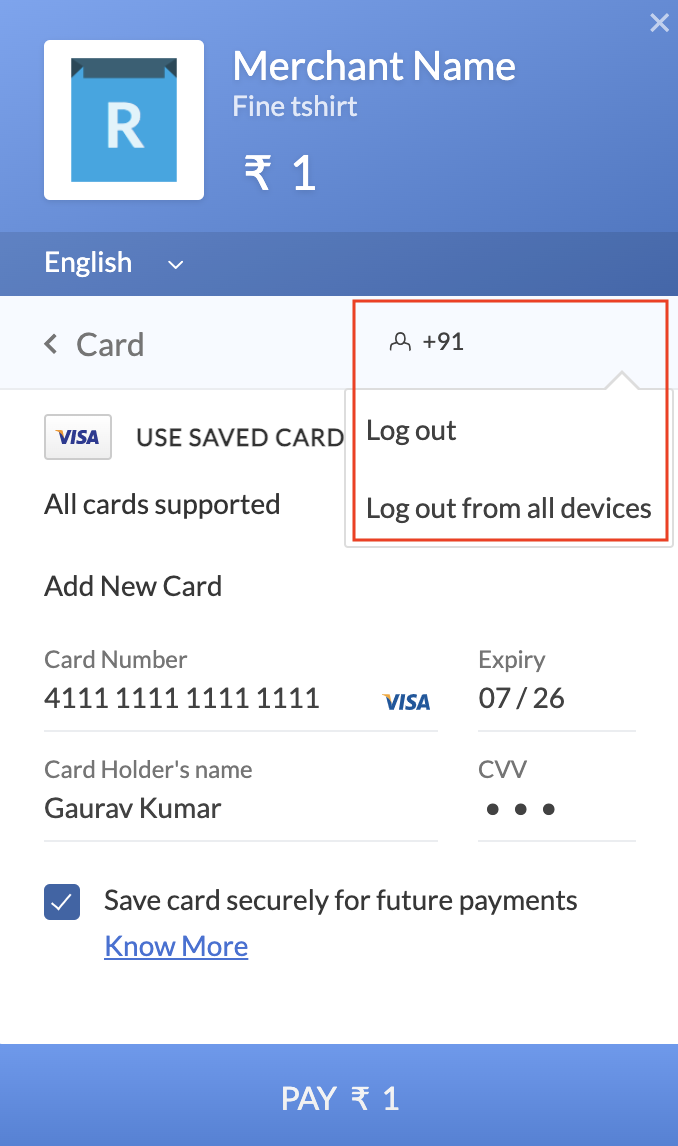
For a safer and secured payment experience, your customer must log out from the Razorpay Checkout by following these steps:

  1. Open Razorpay Checkout.

  2. Select Card as the payment method.

  3. Click the drop-down and select Log out from all devices.

    Log

This logs the customers out from the saved card feature on Checkout.

Watch Out!
For a safer and secure payment experience, please advise your customers to log out of the Saved Cards feature after completing the payment. Doing so avoids any misuse of the card information.

Γ—