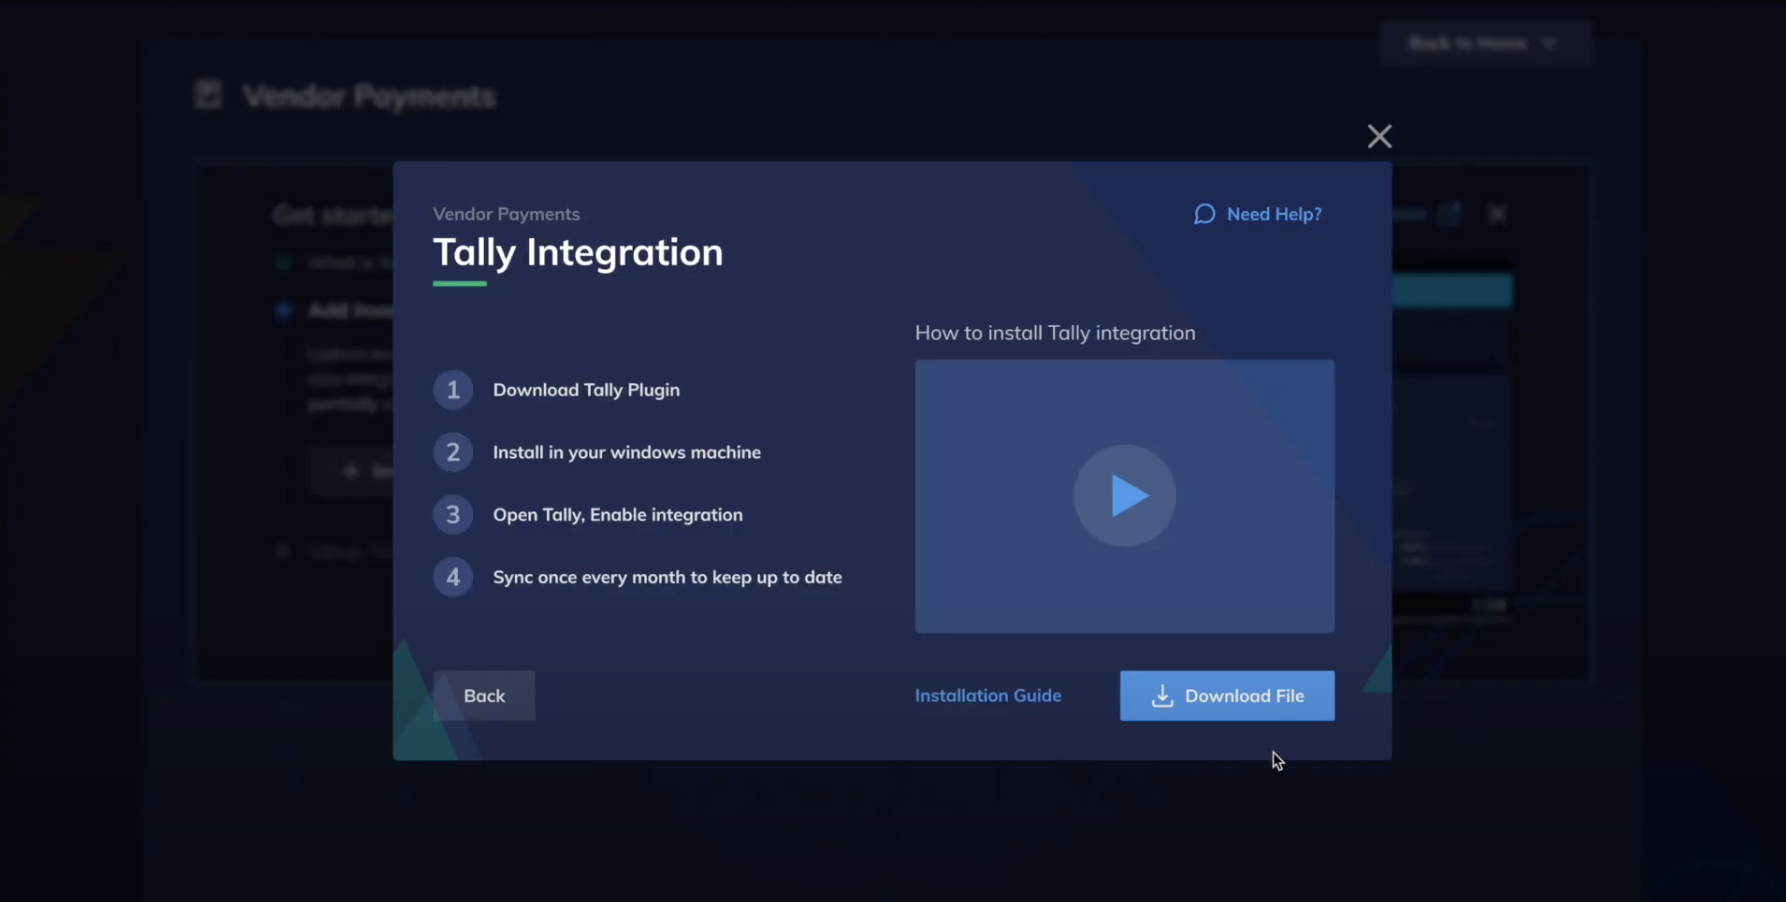
Video Tutorial🔗
Here is a short video on integrating Tally with RazorpayX:
Integrate RazorpayX with the Tally.
You can integrate RazorpayX with Tally for automating your payments and reconciliation. With this integration, you can bring in your payment vouchers that are in Tally into RazorpayX.
Here is a short video on integrating Tally with RazorpayX:
Download the plug-in from the menu.
On your Tally homepage, go to F1: Help and click TDLs & AddOns. The TDL Configuration page is displayed. Browse through your system and select the RazorpayX plug-in that you downloaded as shown here.
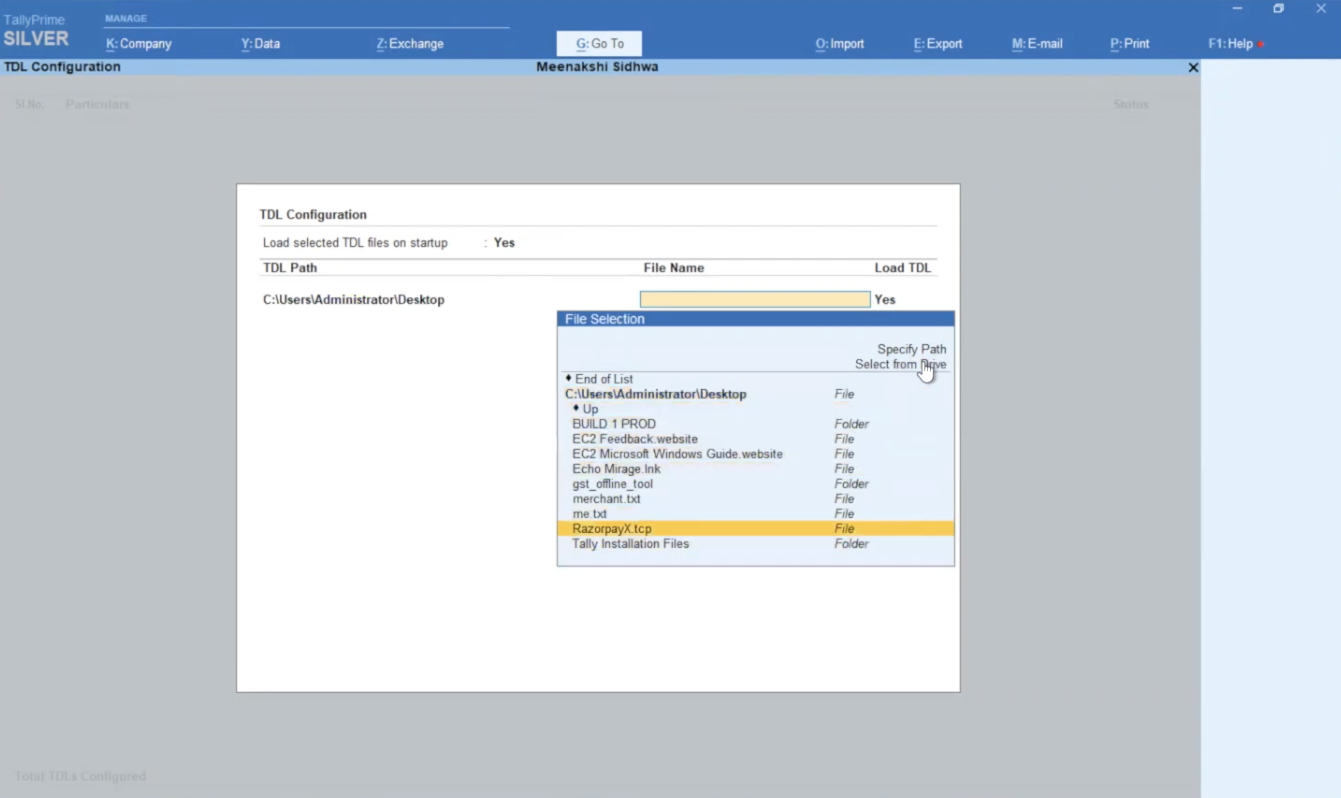
Load and enable the TDL. Note that if you are using Tally on cloud, then you may have to ask your Tally administrator to enable the TDL for all.
With this, the installation is complete.
For more information on this, refer How to Setup TDL and Add-ons in Tally Prime
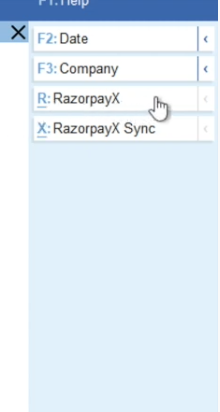
Now open your Tally application. Ensure you are logged in to the Admin account. You will see RazorpayX and RazorpayX Sync listed in the right-hand side menu as shown below:
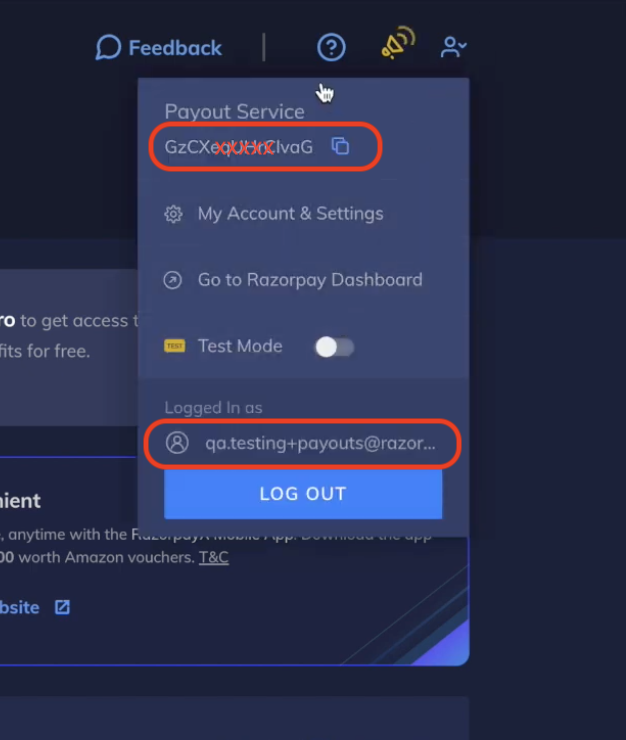
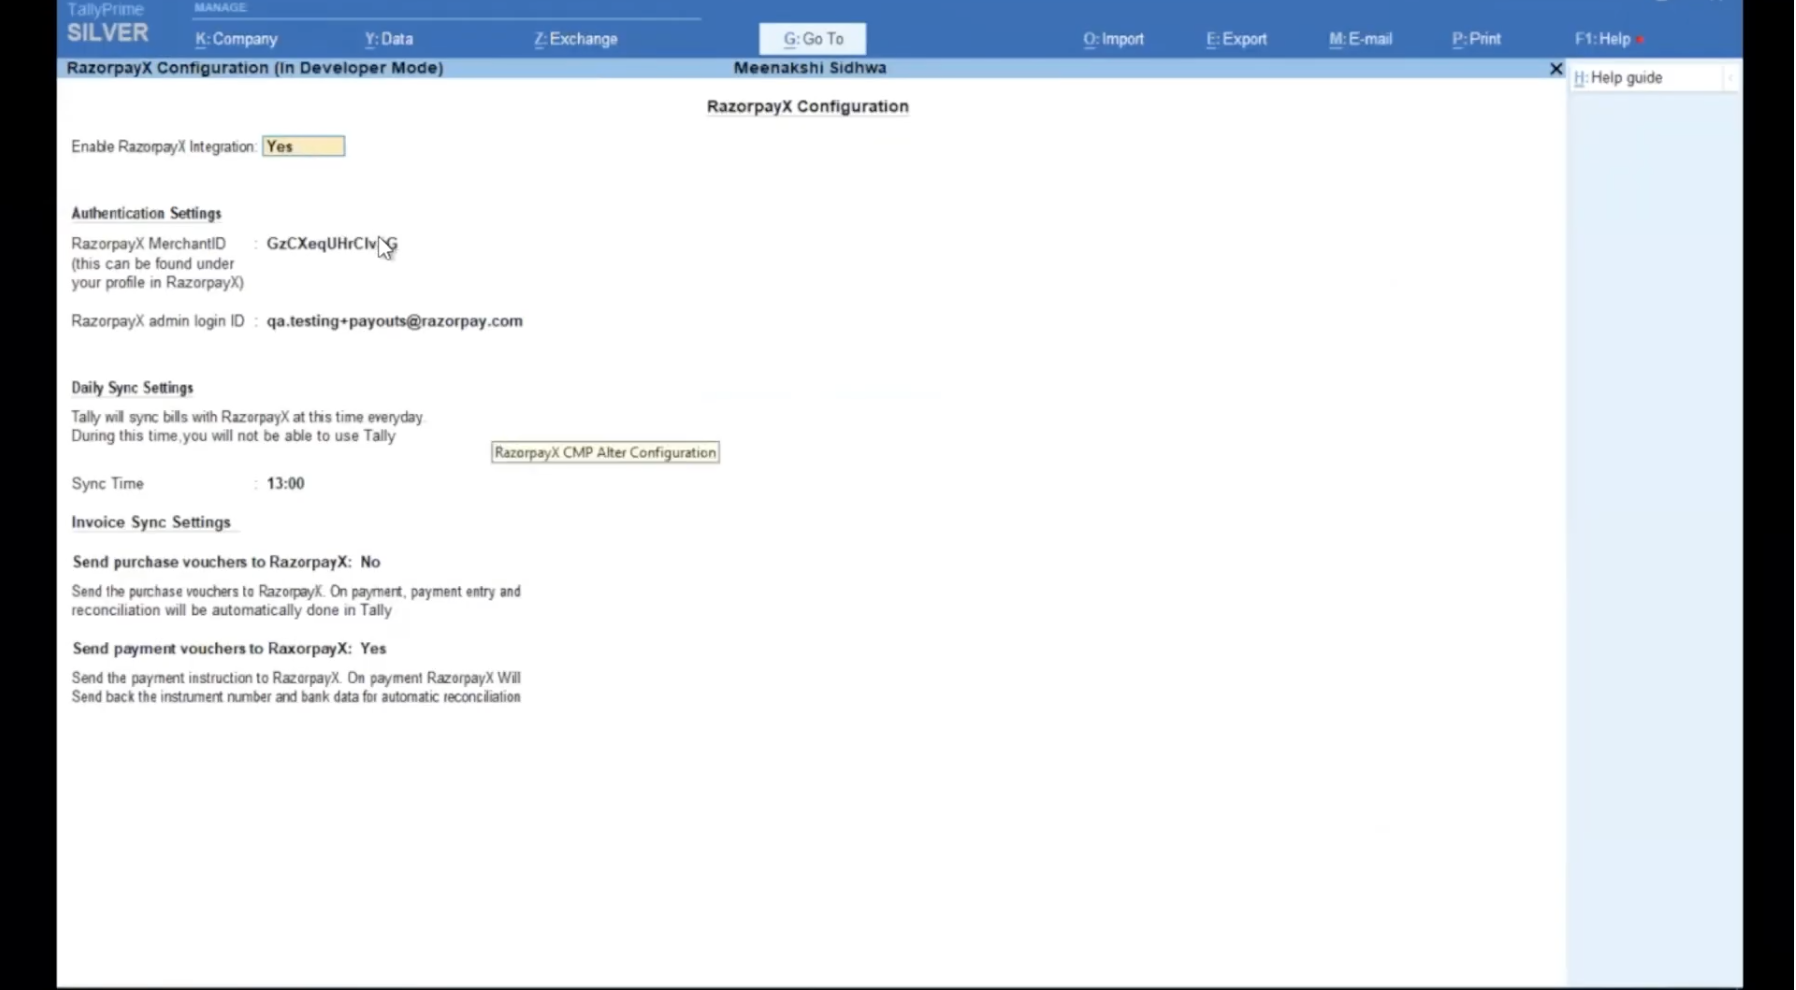
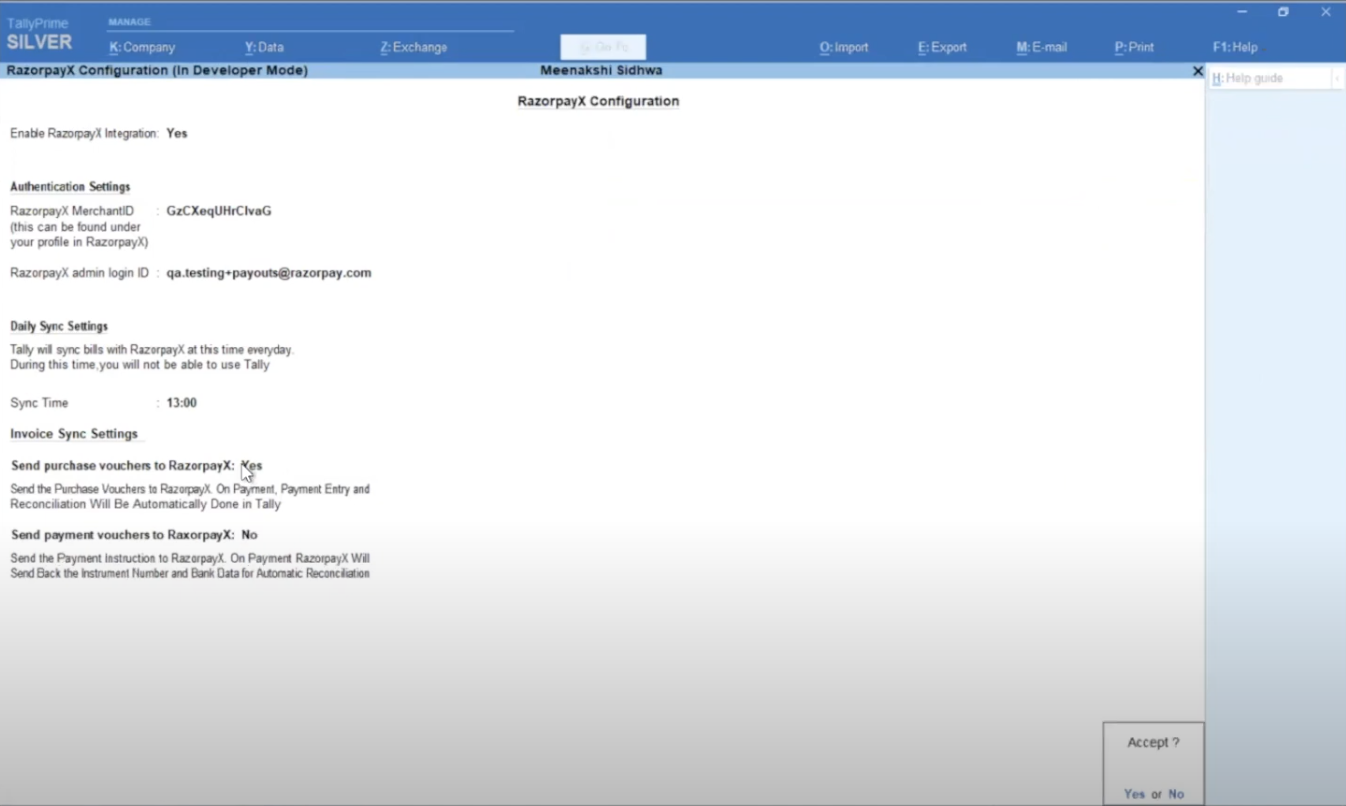
Select RazorpayX to go to the RazorpayX configuration. Select Yes for Enable RazorpayX Integration. Now, enter your Merchant ID and RazorpayX Login Email. You can find this information under your Profile Settings in the RazorpayX Dashboard as shown below.
Once you enter the Merchant ID and RazorpayX Login Email, select the time at which you want the daily sync to happen.
Select a time when you are likely to have the Tally application open. This ensures that all payment vouchers are automatically synced to RazorpayX at this time every day.
Important
You must select either Purchase vouchers or Payment vouchers.
If you choose Purchase vouchers, on creation of the purchase entry, it will be automatically synced to RazorpayX. On paying these in RazorpayX, the payment entry and reconciliation will automatically done in Tally.
If you choose Payment vouchers, once you pass the payment entry with RazorpayX as the bank, it will be synced to RazorpayX for payment and auto-reconciled after successful payment.
Please note that you cannot choose Yes for both Purchase vouchers and Payment vouchers. If you do so, Tally application will throw up an error.
After you have made selection for either Purchase voucers or Payment vouchers, enter the OTP sent to your RazorpayX email. Please check your spam folder in case you do not find the OTP in your Inbox. Please note that you may have to authenticate using the OTP once every week.
Click Yes to enable sync. A window showing progress is displayed as shown below:

Here is a detailed look at what happens when you send Payment Vouchers to RazorpayX:
Select Yes for Payment Vouchers and No for Purchase vouchers as shown here:
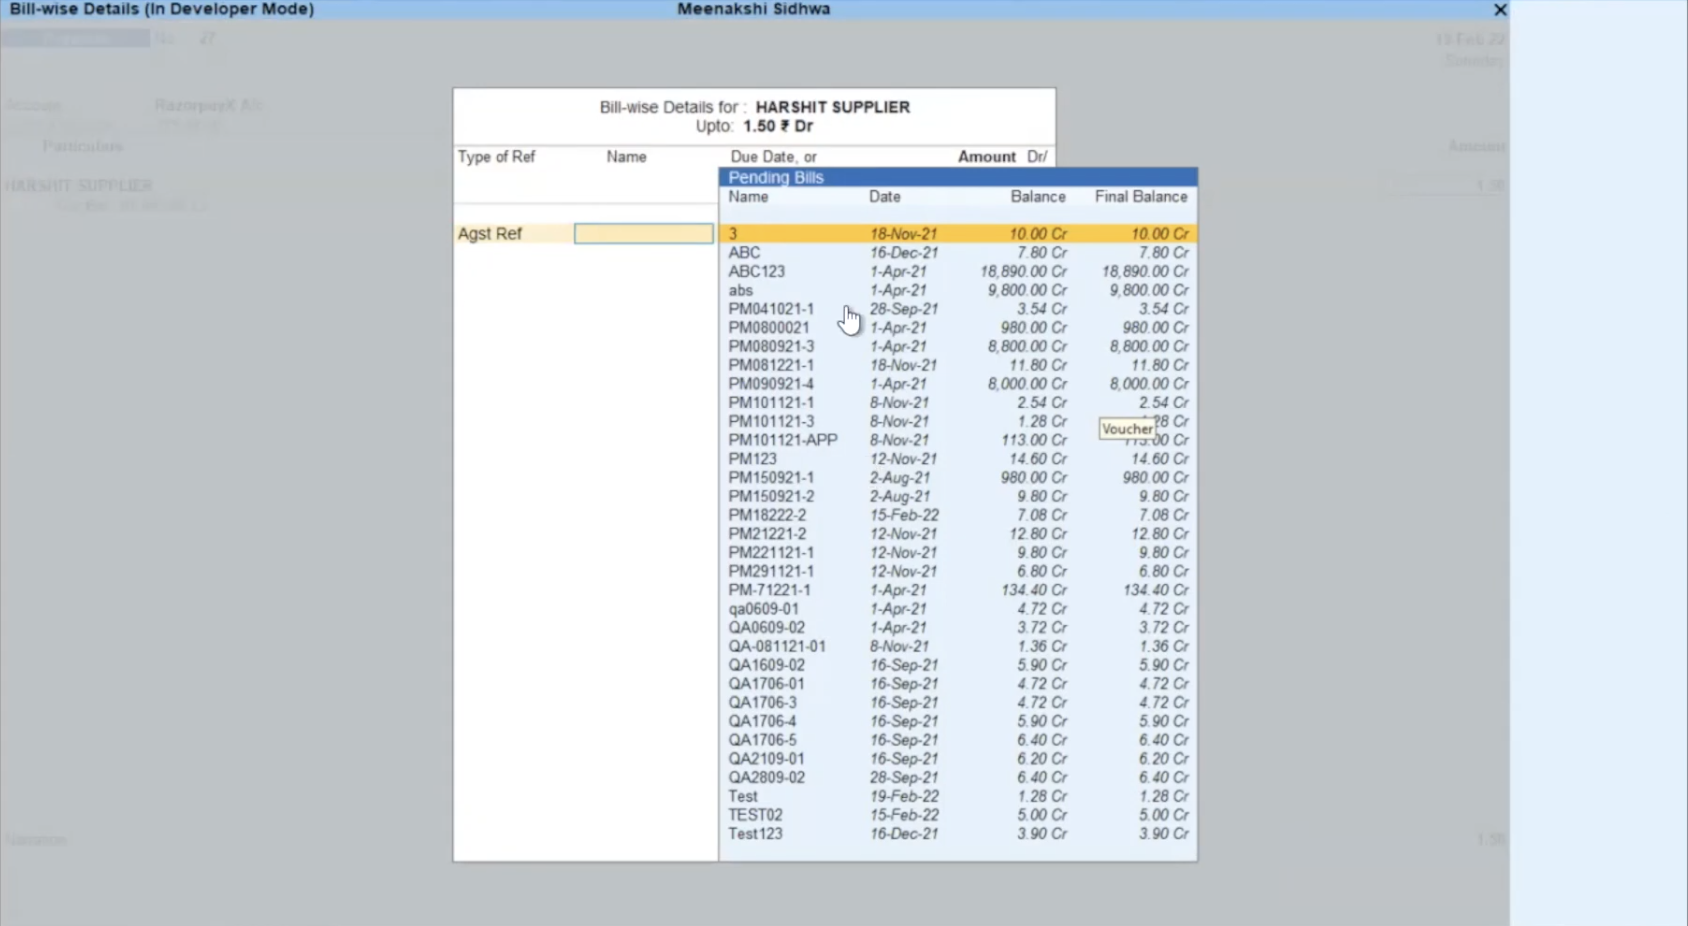
In the Transactions tab in Tally, pass the payment entry with RazorpayX as the bank. That is, select RazorpayX account as your bank ledger in the Account drop-down menu. Choose a vendor under the Amount field. All pending bills for the chosen vendor is displayed as shown below. Select the invoice against which payment has to be made. Enter the details and click Yes when prompted.
Handy Tips
At the moment of integration, the RazorpayX Bank Ledger is automatically selected. It is recommended that you use this ledger as your RazorpayX Ledger.
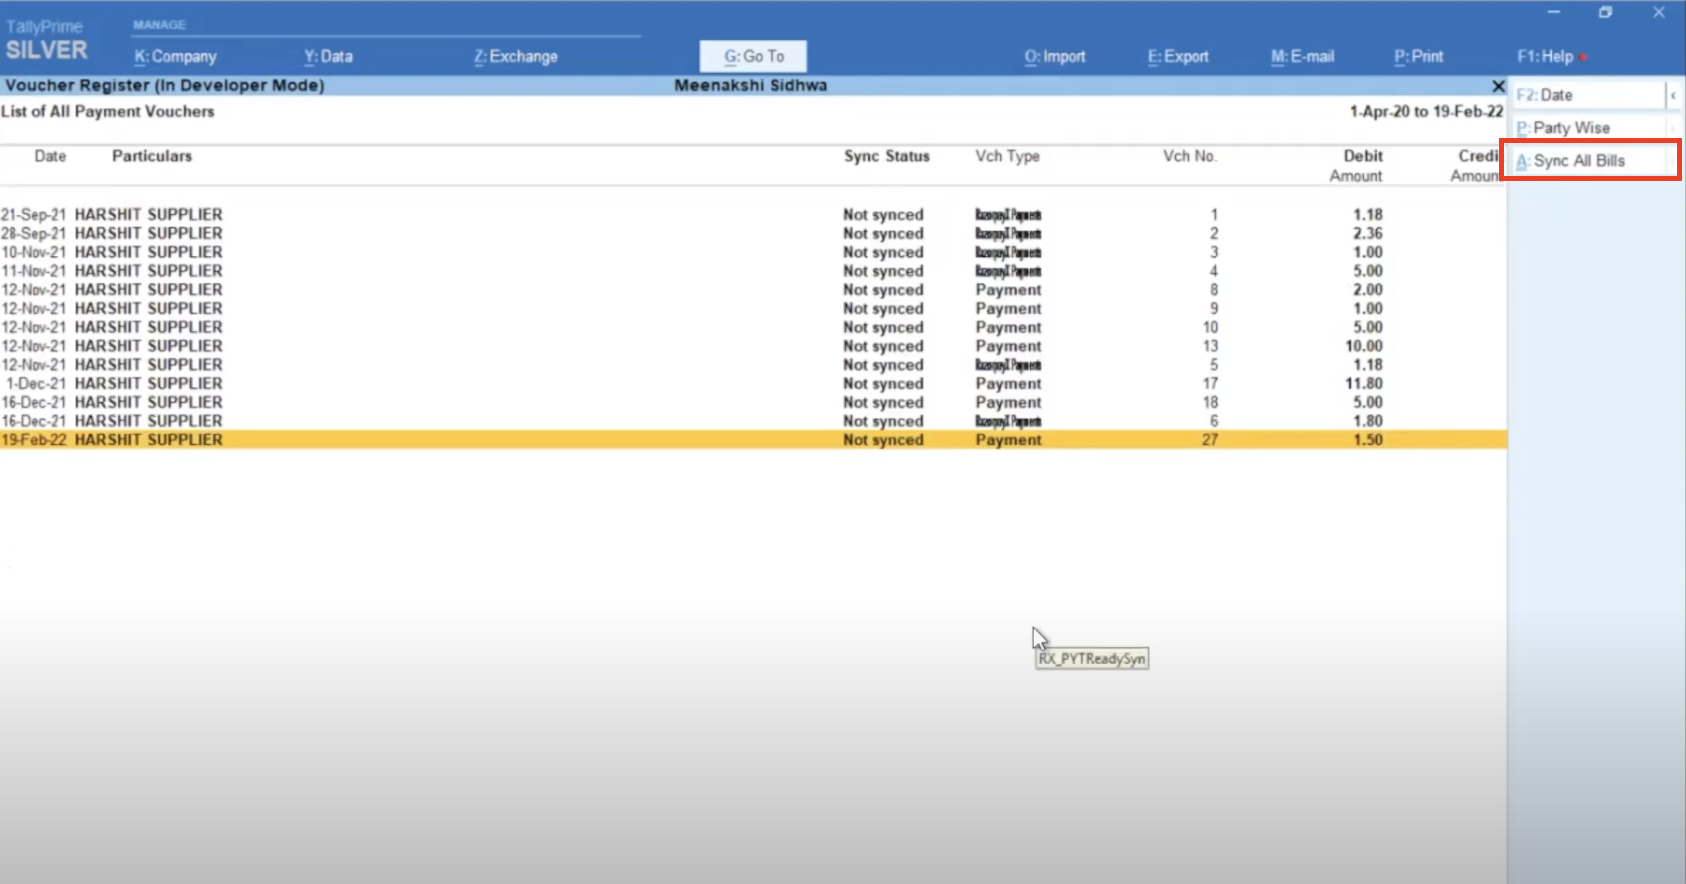
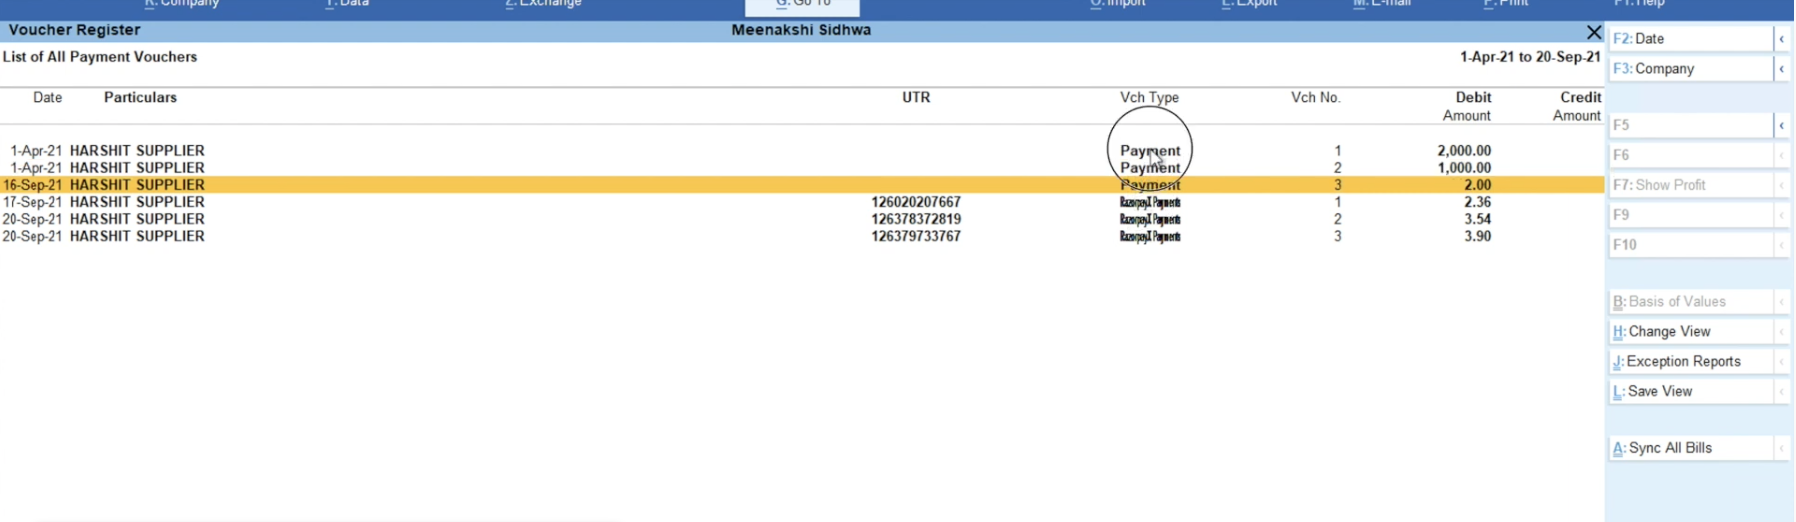
Here is a sample screenshot of payments as seen on Tally. You can click on each of the rows for more particulars. You can also filter the results based on the displayed fields.
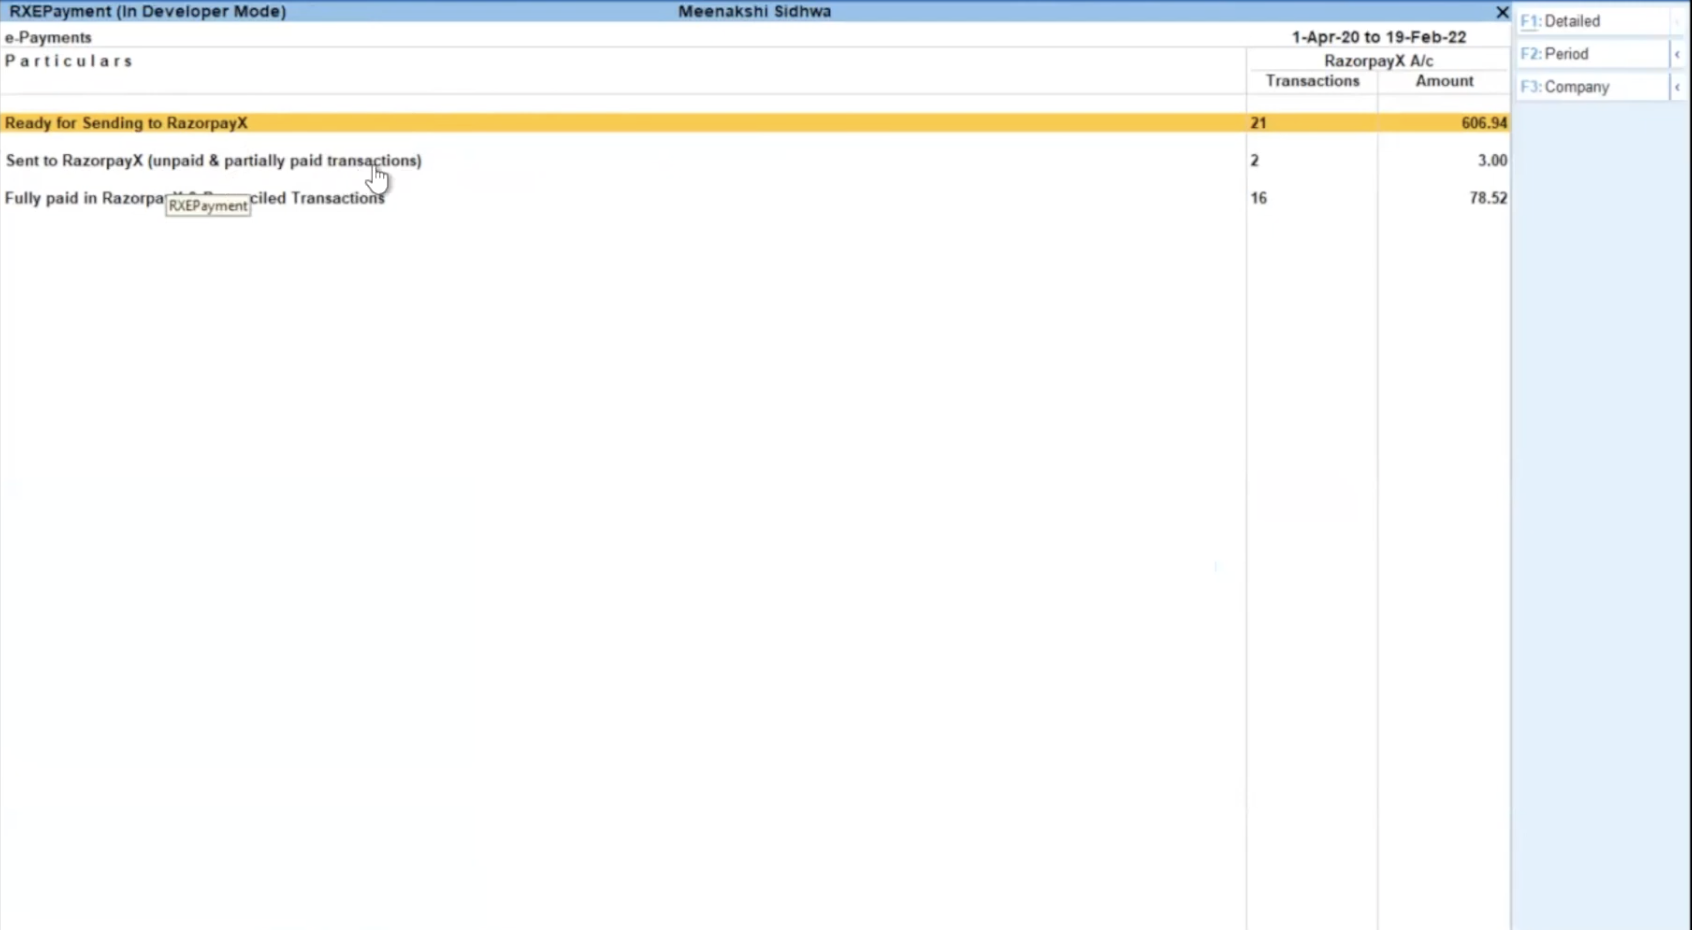
You can sync all of these entries by clicking on Sync All Bills in the right hand menu as shown below.
Now, you can go back to RazorpayX and pay your invoices as per the standard vendor payment flow.
Here is a detailed look at what happens when you send Purchase Vouchers to RazorpayX:
Select Yes for Purchase Vouchers and No for Payment vouchers as shown here:
An OTP is sent to your email address. Confirm OTP. Choose Yes when prompted.
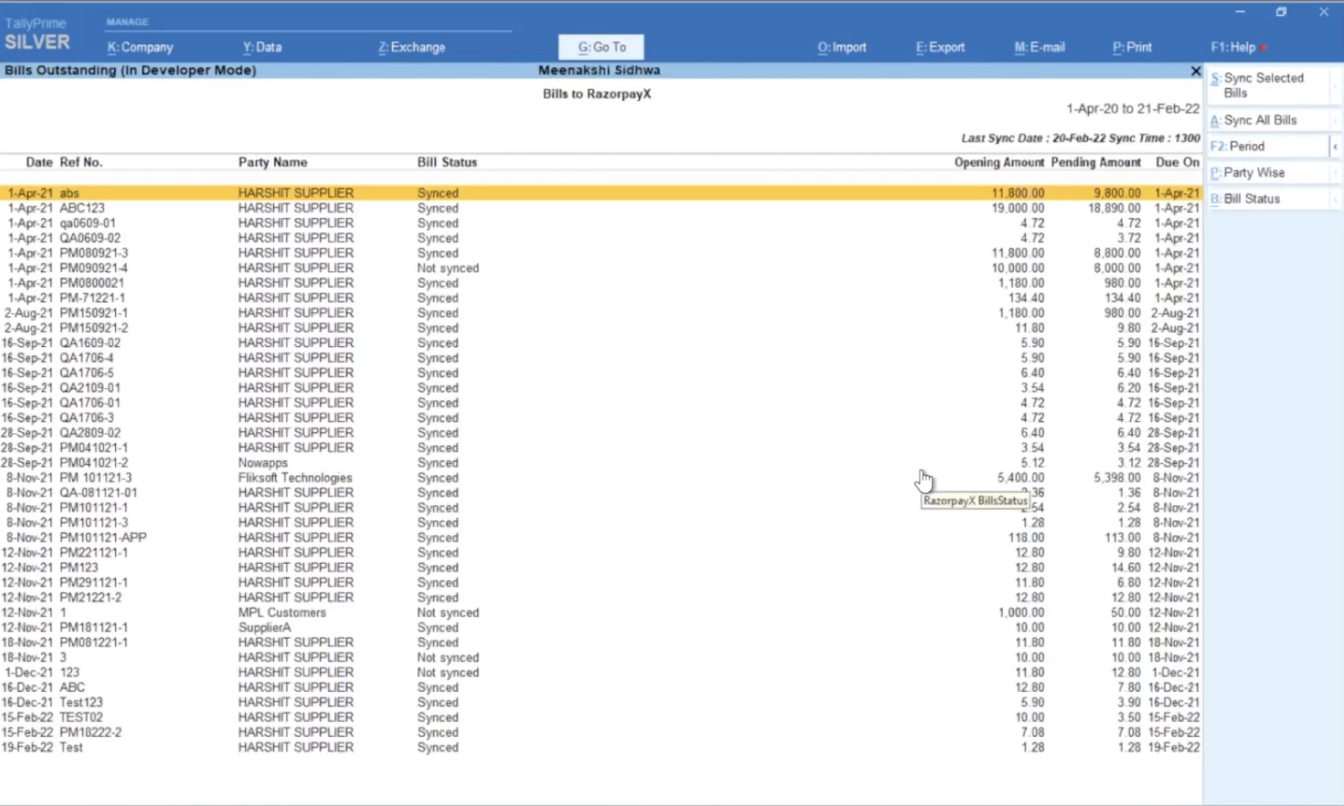
Go to Gateway of Tally → RazorpayX → RazorpayX Bills.
Any bill that you have created in Tally will automatically be shown in this section as shown below:
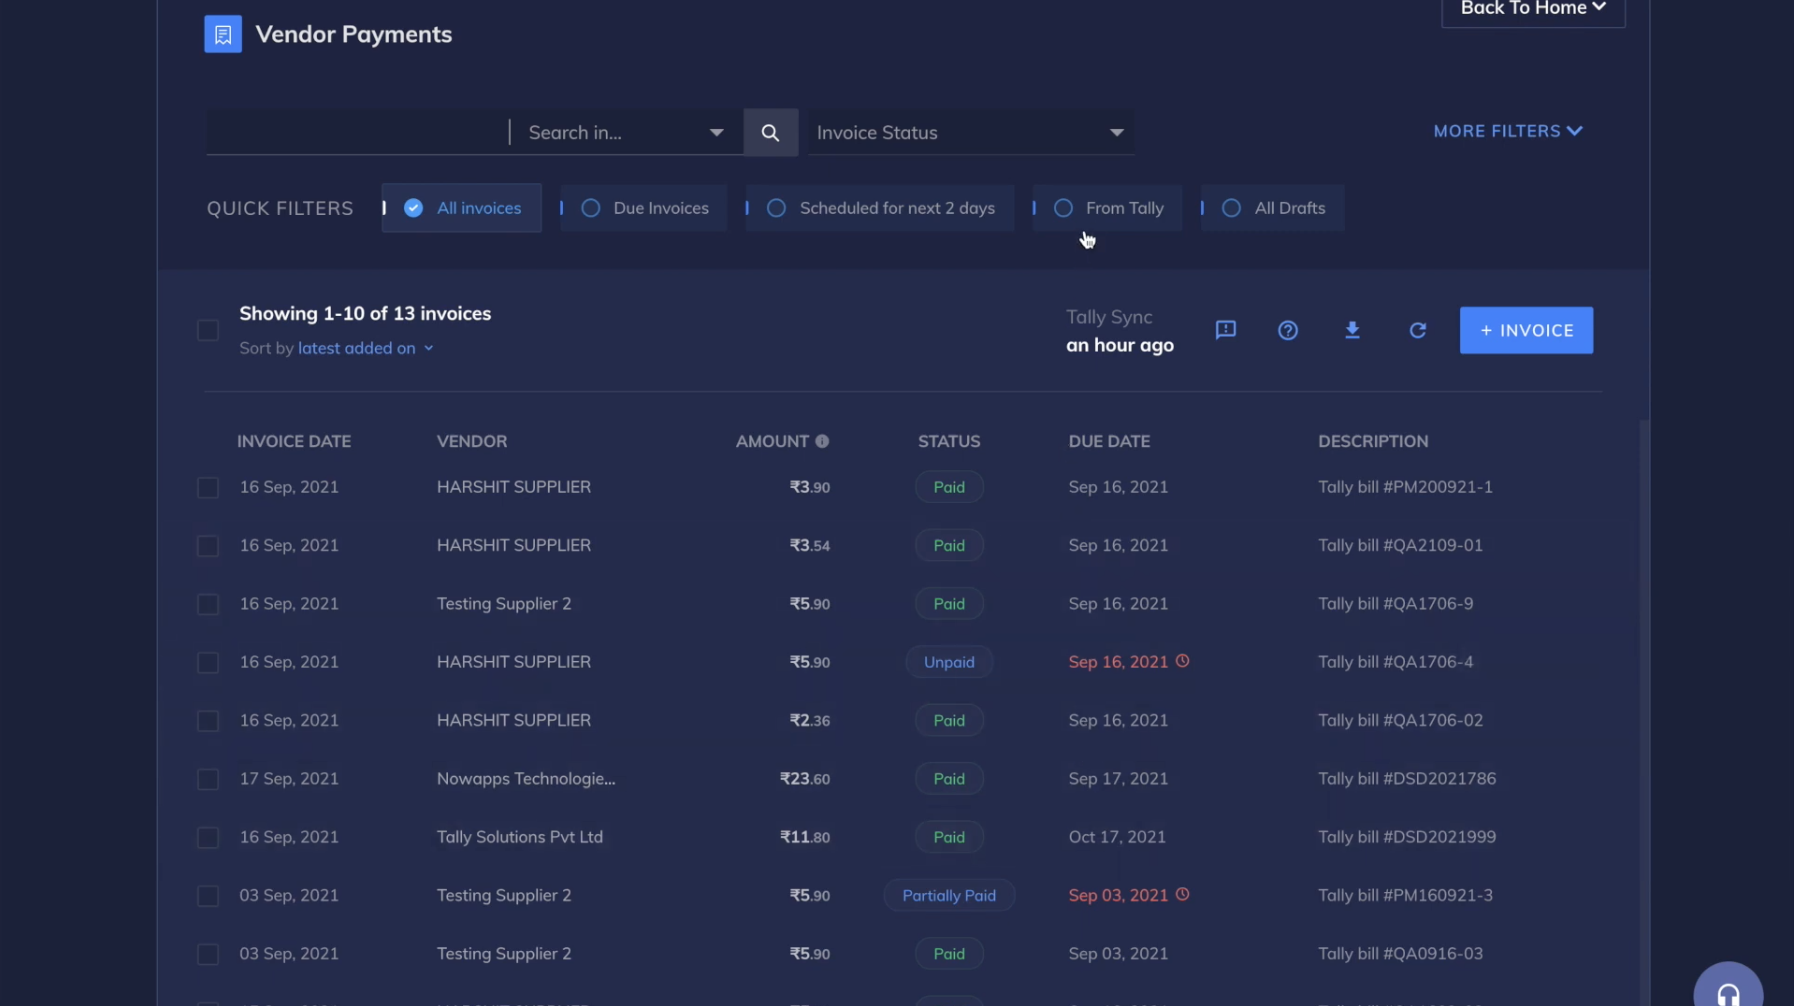
You can sync the bills from here. Back in RazorpaX, this Purchase entry can be seen in the Vendor Payments app. You can go ahead and make the payment for this entry as per the normal procedure.
Once paid, you can find it in Tally under RazorpayX Payments → RazorpayX Payment Summary with the UTR synced automatically. Now, go to RazorpayX Vendor Payments App. You will see that all Tally payments are listed along with the status as shown below. You can now proceed to make the payments using the usual payout flow. You can also make part payments.
Once paid and synced, the payment data is reconciled in Tally. We can view the payment details along with the UTR number under RazorpayX → RazorpayX Payments → RazorpayX Payment Summary as shown below. You can also view the payment details in your bank ledger.
All payments are updated in the RazorpayX Payment Ledger as well.
Watch Out!
You must re-login once every 7 days for security purposes and to keep your data safe.